
| Main Page > Printable |
| FAQ | |||||||||||||||||||||||||||||
|
| Glossary |
| How To / Articles | ||||||||||||||||||||||||||||
|
| Purchasing / Ordering / Registering | |||||||||
|
| Scripts |
| Solutions to Known Issues | ||||||||||||||||
|
| Tools and Add-ons |
| VVEngine | ||||||||||||||||||||||||||||
|
| VVEngine Gadget |
Did You Know? |
| You Can Automatically Synchronize Conflicts |
When you synchronize two locations and a file has changed on both sides since the last synchronization, that file will be identified as a conflict by ViceVersa. Since the same file has changed on both sides, ViceVersa does not know which version to keep and which one to overwrite.
Starting with ViceVersa PRO version 3 you can instruct ViceVersa to synchronize the conflict files by keeping the newer file and overwriting the older file and, at the same time, renaming the older file into filename_[timestamp]_CONFLICT.ext
In this way, all files are synchronized including conflicts, but old conflict files will be renamed with a timestamp and still be kept in the same folder for potential review by the user.
The option to activate renaming of conflicts is in profiles settings -> advanced settings and it is called: Synchronize files even if in conflict (synchronization method)
| You Can Compare Files in Source and Target Using SHA-256 at the same time as CRC32 |
Starting with ViceVersa PRO version 3, there is a new option called Use also SHA-256 hash for comparison.
You can use this option with CRC comparison.
When this option is enabled, ViceVersa will calculate both the SHA-256 along with CRC32 values during comparison and will use these to compare file contents.
Using SHA-256 is more reliable than just using CRC32 to compare file contents, however it is slower.
| You Can Copy Files 'Once Only' (from Source to Target) |
Consider the following scenario:
Files are present in a folder (the source) and they need to be copied to a target folder. Once the files are in the target folder they can be moved away by some further processing. However, even if the files in target folder are removed, the same file must not be copied again from source to target by ViceVersa.
Only if it changes in source, the same file must be copied again after the initial copy: we need to copy the files from source to target "once only".
This requirement can be satisfied by using ViceVersa in two different ways:
A) By using the no rescan target option in ViceVersa. With this option ViceVersa does not rescan the target after the initial scan, so it does not know that the file was removed, hence it will not copy the same file again from source unless it changes after the initial copy.
This setup works fine, but it requires ViceVersa to use a tracking database, and if the tracking database is damaged or lost (unlikely), the files will all be copied again.
B) A second approach is available since ViceVersa version 3 build 3005. Making use of the Windows Archive Bit. The new option is called Copy source files once only, using the archive bit.
When this new option is enabled:
- ViceVersa will only copy files that have the Windows archive bit set, and exclude the rest.
- Then, once the files are successfully copied, ViceVersa will clear the archive bit so the files will not be copied again next time unless they change, even if the corresponding target file is removed from the target.
Since the archive bit is only set by Windows when a file changes or on a new file, and its reset by ViceVersa after copying the file when the option Copy source files once only, using the archive bit is enabled, this will result in a file being copied only once from source to target, unless its contents change, even if the corresponding file in target is removed.
This new option is available in profile settings -> advanced settings -> more settings and requires ViceVersa version 3 build 3005 or newer.
| You Can Easily Calculate File Hashes with a Windows Explorer ViceVersa Extension |
Starting with ViceVersa PRO version 3, there is a new option under Preferences called Install 'File Hashes Windows Explorer Extension'.
If you enable this and let ViceVersa install the extension, you will be able to right click on multiple files in Windows Explorer and show their most common file hashes: CRC32, MD5, SHA-1, SHA-256, KECCAK and SHA-3.
The extension can be installed and uninstalled easily and quickly from the ViceVersa Preferences as needed.
| You Can Move Files from Source to Target |
With ViceVersa PRO 3 (or newer) you can move files from Source to Target.
The 'Move to Target' option is in Profile Settings -> Execution.
This option can be enabled if the Replication (Update Target) method is selected.
When the 'Move to Target' option is enabled, then:
*
All files/folders in Source that are not in Target will be moved to
Target (e.g. they will be copied to Target and then deleted from Source if the copy is successful).
* All newer files in Source are moved to Target to overwrite older files in Target (e.g. if a file is newer in Source, it will be copied to Target and then deleted from Source if the copy is successful).
*
If a Source file has a matching Target file already, it is not copied, but the file is deleted
from Source because it is already in Target.
It is also possible to move only specific files based on file filters, such as the file size, name, extension or date/time.
| You Can Reduce the Amount of Memory Used by ViceVersa |
Starting with ViceVersa PRO version 3, a new option called Minimize Memory Usage has been added to the profile settings (under Performance).
Enabling this option will result in a much lower memory usage by the profile: memory usage will be almost halved. This new option is useful when dealing with a lot of files in a profile, e.g. more than one million, as a guideline. Note that folder comparison will be marginally slower when this option is enabled.
| You Can Replicate / Synchronize File and Folder Security Attributes |
ViceVersa PRO always had the option to copy file and folder security attributes (permissions, ownership and optionally auditing) when a file or folder is copied between NTFS file systems.
Starting with ViceVersa PRO version 3, security attributes can now be replicated also for existing files, that is files that are already both in Source and Target and do not need to be copied again, and for files where only security attributes have changed since last replication/synchronization.
This new option is called Recheck file / folder security during comparison.
When this new option is enabled, ViceVersa will re-check and re-align the selected security attributes for all files and folders in Source and Target.
This means that the selected security attributes will be re-checked during comparison and will be re-adjusted during profile execution, and not only for files and folders that are copied but also for files and folders that are already both in Source and Target and for which only security attributes have changed.
Furthermore, VVEngine is able to detect changes in only security attributes, when working in real-time, and will replicate them if they change (without copying the file again, if the file hasnt changed, only the security attributes).
Note that when only security attributes have changed for a file, then the security attributes are always copied from Source to Target, never from Target to Source.
| You Can Use ViceVersa PRO and VVEngine with Amazon WorkDocs Drive |
Amazon WorkDocs Drive is a mounted drive that provides access to all of your files that are on Amazon WorkDocs cloud. You can access, copy, delete and edit the files, just as if they were stored locally, using Windows File Explorer or any other application including ViceVersa and VVEngine.
The mounted drive will behave like any other drive or network share: ViceVersa will be able to synchronize/replicate files from/to the drive.
Multiple PCs and servers will be able to sync/replicate files from/to the Amazon WorkDocs drive in the cloud. Amazon WorkDocs will provide the secure and reliable file storage in the cloud, accessible as a standard share and mappable as a local drive letter.
Amazon WorkDocs Drive is available for Microsoft Windows, macOS, and for Amazon WorkSpaces.
How does Amazon WorkDocs Drive work?
With Amazon WorkDocs Drive, all of your content on Amazon WorkDocs is available on-demand through a mounted drive. You can sync, backup, replicate to/from this drive using ViceVersa and VVEngine.
Where can I download Amazon WorkDocs Drive?
Login your Amazon Workdocs and download the installer from there.
How do I set up Amazon WorkDocs Drive?
When Amazon WorkDocs Drive is launched for the first time, you will be prompted to enter a site name. Once your site name is entered, you will enter your user name and password.
What happens when you open a file in Amazon WorkDocs Drive?
The file is downloaded on-demand for you to view or edit. When you save or close the file, it is automatically synced to Amazon WorkDocs Drive. There is no local copy stored on your desktop, unless you have favorited the file for offline access.
Can I perform standard actions on files and folders on Amazon WorkDocs Drive?
Yes, you can create, rename, copy, move, and delete files and folders as if it was a local drive, however the files and folders are stored in the cloud.
More information on Amazon WorkDocs and Amazon WorkDocs Drive:
https://aws.amazon.com/workdocs/
https://docs.aws.amazon.com/workdocs/latest/userguide/workdocs_drive_help.html
| You Can Use ViceVersa PRO and VVEngine with Microsoft Azure Files |
Microsoft Azure Files offers fully managed file shares in the cloud that are accessible via the industry standard Server Message Block (SMB) protocol (also known as Common Internet File System or CIFS).
Azure File shares can be mounted concurrently by cloud or on-premises deployments of Windows, Linux, and macOS.
Azure Files key benefits
- Shared access. Azure File shares support the industry standard SMB protocol, meaning you can seamlessly replace your on-premises file shares with Azure File shares without worrying about application compatibility. Being able to share a file system across multiple machines, applications/instances is a significant advantage with Azure Files for applications that need shareability.
- Fully managed. Azure File shares can be created without the need to manage hardware or an OS. This means you don't have to deal with patching the server OS with critical security upgrades or replacing faulty hard disks.
- Scripting and tooling. PowerShell cmdlets and Azure CLI can be used to create, mount, and manage Azure File shares as part of the administration of Azure applications. You can create and manage Azure file shares using Azure portal and Azure Storage Explorer.
- Resiliency. Azure Files has been built from the ground up to be always available. Replacing on-premises file shares with Azure Files means you no longer have to wake up to deal with local power outages or network issues.
Azure Files how to:
Create Azure File Share
Connect and Mount on Windows
Using Azure Files with ViceVersa and VVEngine
Once the file share in the Azure cloud is created, it can be used locally as a standard disk/folder share by all applications including ViceVersa and VVEngine.
The share will behave like any other network share on the LAN: ViceVersa will be able to synchronize/replicate files from/to the share and VVEngine will also be able to monitor for file changes on the share and synchronize/replicate files in real-time.
Multiple PCs and servers will be able to sync/replicate files from/to the Azure share in the cloud. Azure Files will provide the secure and reliable file storage in the cloud, accessible as a standard share and mappable as a local drive letter. Importantly without the need to administrate or setup a new server or virtual machine.
The share will provide end-to-end encryption when using SMB 3.0. See How to Check the SMB Version of Your Network Connection
| You Can Use ViceVersa PRO and VVEngine with OneDrive, Dropbox, Creative Cloud Files and More |
OneDrive, Dropbox, Creative Cloud Files are cloud services that provide a local path, or a mounted drive, where you can access all your cloud files. You can access, copy, delete and edit the files, just as if they were stored locally, using Windows File Explorer or any other application including ViceVersa and VVEngine.
The mounted drive / path will behave like any other drive or network share: ViceVersa will be able to synchronize/replicate files from/to the drive, from other hard disks or external USB drives, SSD.
Some of these services also support change notifications (for example, OneDrive does), so that VVEngine will be able to execute in real-time, detecting file changes in the cloud drive and synchronizing / replicating changes locally. For example, one could setup a real-time sync between a folder on OneDrive and a folder on a local USB drive. Each time a change happens to the folder on OneDrive (a change that can be made on a phone for instance), the change is automatically replicated to the USB drive.
If you have a lot of files on OneDrive or other cloud services, you might want to make a copy to a backup drive for safety reasons. For that, you can use ViceVersa, which will compare your OneDrive vs another folder and only copy files that have changed since the last mirror, without copying every file each time.
| You Can Use ViceVersa PRO with a VeraCrypt File Container |
ViceVersa PRO and VeraCrypt are fully compatible. Once the VeraCrypt container is created and mounted, you can use it as a Source or Target in ViceVersa.
More information:
- Create and mount a VeraCrypt container
- VeraCrypt Home Page
| You Can Use ViceVersa PRO with Windows Virtual Hard Disk Files (VHD) |
ViceVersa PRO is fully compatible with mounted Windows Virtual Hard Disk Files (VHD). Once the Virtual Hard Disk File is created and mounted, you can use it as Source or Target in ViceVersa PRO. The Virtual Hard Disk File will act as a single file container.

FAQ |
| Are the ViceVersa PRO Downloads and Installation Files Safe? |
Yes, they are!
We all need to be very careful when installing new software that is downloaded from the web. At TGRMN Software, we guarantee that all our downloads, installers and software products are top quality and:
- Virus-free.
- Spam-free.
- Ads free.
- Lightweight and not bloatware. Our downloads are only a few megabytes.
- Digitally signed by TGRMN Software for extra security and guarantee.
- Only install the software that is actually downloaded, ViceVersa PRO or VVEngine, no additional/other unwanted software. No other software is bundled with our products.
- Do not change or alter system-wide settings, including registry, system files or other operative system settings.
- Do not affect the functioning of the operative system, hardware or other running programs.
- Do not install any Windows Services, unless explicitly requested when setting up the VVEngine scheduler to run as a service (optional).
- Do not install/replace any Windows Drivers or Kernel software.
- Only install and copy files to the designated installation folder.
- Do not require a system reboot after installation.
- Self-contained and do not require any third-party components or libraries to run.
- Can be uninstalled easily, cleanly and quickly, without leaving any traces or system changes behind, via the standard Windows Control Panel. Clean Uninstall
- Do not communicate back home any information to us at all, nor collect or transmit any information to third-party. Zero. Nothing.
TGRMN Software has been selling ViceVersa PRO and VVEngine since 2001, you can trust all our products. You can download, install and use ViceVersa PRO and VVEngine with confidence.
Please visit our Users Forum to discuss with other users.
Please contact sales@tgrmn.com for any questions or clarifications.
Read the End-User License Agreement.
| Are ViceVersa PRO and VVEngine compatible with Windows on ARM? |
Yes, both ViceVersa PRO 6 (and later) and VVEngine 3 (and later) are fully compatible with Windows on ARM.
| Can I Use ViceVersa to Backup ACT! Files? |
Yes.
Starting with ViceVersa PRO version 2, the Volume Shadow Service is used to copy files and databases while they are in-use or locked. See http://www.tgrmn.com/web/kb/item33.htm for more information.
| Can I Use ViceVersa to Copy Files That Are 'In-Use', Such as PST Files and Databases? |
Yes.
Starting with ViceVersa PRO version 2, the Volume Shadow Service is used to copy files and databases while they are in-use or locked. See http://www.tgrmn.com/web/kb/item33.htm for more information.
| Can ViceVersa Backup Hyper-V Virtual Machines? |
Yes, ViceVersa PRO can backup Hyper-V virtual machines using the new Windows Hyper-V Volume Shadow Copy Service (VSS) Writer.
There are two basic methods you can use to perform backups of Hyper-V virtual machines with ViceVersa PRO:
(a) From within the Hyper-V virtual machine (guest-based backup). In this scenario, ViceVersa PRO runs within the virtual machine to backup files. This is the same process you would use to backup files on any other operative system.
(b) From the Hyper-V host (host-based backup). In this scenario ViceVersa PRO runs on the host computer (outside the virtual machines) and uses the Hyper-V VSS Writer to backup the virtual machines. Using this method is recommended, because it captures more data. This type of backup includes the configuration of virtual machines and virtual networks, snapshots associated with the virtual machines, and all the virtual hard-disks used by the virtual machines. The virtual hard-disks contain the entire guest operative system, Windows Registry, and any data or applications installed in the guest. This method allows so-called baremetal restore of the Hyper-V virtual machines.
Detailed information available in this PDF document ![]() BACKING-UP HYPER-V VIRTUAL MACHINES WITH VICEVERSA PRO
BACKING-UP HYPER-V VIRTUAL MACHINES WITH VICEVERSA PRO
| Can ViceVersa Be Set Up for Scheduling? |
Yes, you can set up automatic file synchronization, file replication or file backup, using one of the following tools:
1) Use the Windows Task Scheduler and the ViceVersa Command Line (ViceVersa PRO and PLUS). Command line options for ViceVersa are documented in the help file.
2) Use VVScheduler (ViceVersa PRO). VVScheduler is included in the ViceVersa PRO download and can be accessed from the 'Tools' menu. VVScheduler can schedule multiple profiles to run periodically at a certain time.
3) Use VVLauncher (ViceVersa PRO). VVLauncher is included in the ViceVersa PRO download. VVLauncher can schedule one profile at a time and can run it as soon as file changes are detected in folders.
4) Use VVEngine  (ViceVersa PRO). VVEngine is our most advanced scheduling tool for ViceVersa PRO, available as a separate download. With VVEngine you can manage multiple profiles using the Internet Browser; organize profiles into categories; set profiles to run every X minutes, every X hours, every X days; set your profiles to run at startup or as soon as file changes are detected; detect external drives and network connections, re-run profiles on error and much more ...
Click Here for more information on VVEngine
See the different tools' capabilities in the Scheduling Comparison Chart
| Does ViceVersa Handle Path Names Longer Than 259 Characters? |
It is quite rare to exceed 259 characters for a file path name. If that is needed, ViceVersa PRO supports long path names exceeding 259 chars.
To enable this in a specific folder use the prefix "\\?\".
For example, to allow paths longer than 259 characters in c:\folder\backup\ use \\?\c:\folder\backup\ as source (or target, or archive folder) in ViceVersa PRO.
Using "\\?\" permits a maximum path length of approximately 32,000 characters composed of components up to 255 characters in length.
To specify a UNC path, use the "\\?\UNC\" prefix.
For example, "\\?\UNC\<server>\<share>".
This requires ViceVersa PRO 3 build 3003 or newer.
How to enable NTFS Long Paths in Windows (PDF)
| Does ViceVersa Support Dark Mode? |
Yes, Dark Mode is available from version 5 of ViceVersa PRO.
Dark Mode in ViceVersa is automatically selected if dark mode is enabled on Windows.
Alternatively, dark mode can be activated manually in the ViceVersa preferences. VVLauncher also supports dark mode.
| Does ViceVersa Synchronize Outlook Files (.PST)? |
ViceVersa treats Outlook Files (.PST) as any other file.
When synchronization is activated, ViceVersa overwrites the older PST file with the newer PST file, based on the files' timestamps.
If changes have occurred in both PST files since the last synchronization (e.g. you have worked on both computers where Outlook is used, without synchronizing first), then a conflict is reported.
The conflict pair needs to be resolved manually, i.e. you need to decide which file to keep.
Please note: ViceVersa does not synchronize individual Outlook e-mails, contacts, appointments.
| Does ViceVersa Work on Windows Server 2008? |
Yes, ViceVersa PRO is fully compatible with Windows Server 2008 (and with Windows Server 2003, 2000). ViceVersa PRO is fully compatible with all editions of Windows Server 2008: Standard, Enterprise, Datacenter, etc. ViceVersa is not compatible with the Windows Server 2008 Server Core mode as ViceVersa requires a GUI to be present.
ViceVersa PRO can run on the server as a Windows Service using the VVEngine add-on.
| Does ViceVersa Work on Windows Server 2012? |
Yes, ViceVersa PRO is fully compatible with Windows Server 2012 and Windows Server 2012 R2.
ViceVersa PRO is fully compatible with all editions of Windows Server 2012 (Essentials, Standard, Datacenter, etc.). ViceVersa is not compatible with the Windows Server 2012 Server Core mode as ViceVersa requires a GUI to be present.
ViceVersa PRO can be easily setup to run as a Windows Service using the VVEngine add-on.
| Does ViceVersa Work on Windows Server 2016 / 2019 / 2022 / 2025? |
Yes, ViceVersa PRO is fully compatible with Windows Server 2016, 2019, 2022, and 2025.
ViceVersa PRO is fully compatible with all editions of Windows Server 2016, 2019, 2022 and 2025 (Essentials, Standard, Datacenter, etc.)
ViceVersa PRO requires Windows Server 2016 / 2019 / 2022 / 2025 with Desktop Experience installed. It does not run just on Server Core as it needs the GUI to be available.
ViceVersa PRO can be easily setup to run as a Windows Service using the VVEngine add-on.
| Does ViceVersa Work with CD-R/CD-RW/DVD-RW Drives? |
Yes, ViceVersa works with CD/DVD Recordable/ReWritable drives (CD-R/CD-RW/DVD-RW) if a proper device driver is installed and configured with your drive. The driver should make the CD/DVD behave like a large floppy disk. Nero InCD (part of Nero 6 or later) and Roxio DirectCD (part of Easy Media Creator) are two products that work with various CD/DVD drives and makes them look like large floppy disks. Check with your CD/DVD documentation.
One simple test to see if ViceVersa will work with your drive is to see if you can copy files from your hard disk to the drive using Windows Explorer. If Windows Explorer can copy files to the drive ViceVersa can too.
Note on Windows XP: Windows XP includes a "lite" version of Adaptec/Roxio's Easy CD and it does not make the CD-R/RW/DVD-RW look like a hard disk. You will need to install a packet writing software such as Roxio's DirectCD for Windows XP. DirectCD is included with Easy Media Creator for Windows XP. DirectCD allows your drive to appear just like any other drive volume. In other words, your CD-R/RW/DVD-RW drive handles files just like a hard disk or floppy disk. Once you have Direct CD installed on your system, you can drag and drop files to the CD/DVD as well as use ViceVersa to backup your files to the CD-R/RW/DVD drives.
| How Do I Apply a File Filter to a Specific Source/Target Pair? |
*** Requires ViceVersa PRO 2.5 build 2502 or any later version ***
I have a profile with multiple source/target pairs: how do I apply a file filter only to one of the pairs? For instance, I would like to include all .doc files, but only from the second pair.
Answer:
Use an include file filter with mask <2>*.doc
The notation <2> will limit the scope of the filter to the second source/target pair.
Similarly, use <1> for the first pair, <3> for the third, etc.
| How Do I Connect Two Computers to Exchange, Synchronize, Backup and Replicate Files? (No Network or Internet File Sharing) |
Please refer to the following Article on wikiHow
| How Does ViceVersa Know Which Files Are Newer and Which Files Are Older? |
ViceVersa uses the timestamp that Windows assigns to every file.
To identify file conflicts, i.e. files that have changed both in source and in target, and to keep track of file deletions, ViceVersa PRO uses a tracking database.
| How Does ViceVersa Work? |
Every time you run a project/profile, ViceVersa compares the files in source and in target to see if they have changed.
By using the file timestamp assigned by Windows, ViceVersa determines which files are identical, which files have changed and which files have been added or deleted.
Then, based on the execution method you specify, ViceVersa will copy and delete files as required.
For example, you can specify Synchronization or Backup or Replication as execution method. ViceVersa will save you time and network usage by only copying files when necessary.
ViceVersa powerful preview feature shows you exactly what is going to happen before any files are touched. Preview even gives you the possibility to copy/delete individual files and to reconcile file conflicts.
ViceVersa PRO can also be scheduled using VVScheduler or run at Windows' start-up, shut-down or as soon file changes are detected using VVLauncher (included in the ViceVersa PRO download).
| How to Avoid Time-Consuming Rescanning of Source and Target Folders? |
I have setup a ViceVersa profile to copy files between multiple computers (they are all servers). It is working fine. However when I create a test file and save it to a local folder (the source) that is in the profile, it takes a while to get around to the other machines even though I have the profile set to update immediately as soon file changes are detected.
I'm concerned about this, because the root folder in this profile contains 10GB of data and if I save just one file it runs the entire profile to update (it rescans the entire source and target folders). What can be done to avoid this and avoid using too many resources?
You can use the new file or subfolder level change detection functionality in VVEngine Server Premium.
The new file or subfolder level change detection functionality does not require a full re-comparison of source or target and this speeds up execution substantially, especially over slow connections or with a large amount of files. VVEngine will keep track of which files have changed, are new or have been deleted, and when the profile runs it will apply changes to the other side without performing a full rescan.
Learn more about VVEngine
Learn more about the new file or subfolder level change detection
| Is ViceVersa Multithreaded? |
Yes, starting with version 6, ViceVersa is fully multithreaded.
Multithreading while copying, deleting, and scanning files can significantly increase speed, especially over the network (LAN, WAN, and SMB) and when working with SSD drives.
Multithreading Options in ViceVersa
Scan Target While Scanning Source (Prefetch Target): (Yes/No) This option can help improve scan performance in certain scenarios, as ViceVersa simultaneously scans the source and target.
Multithreaded Source Scanning: (Yes/No/Auto) Use multiple threads to scan the source. It is recommended over the network and with SSDs. This option will help speed up the scanning time quite significantly.
Multithreaded Target Scanning: (Yes/No/Auto) Use multiple threads to scan the target. It is recommended over the network and with SSDs. This option will help speed up the scanning time quite significantly.
Multithreaded Comparison: (Yes/No/Auto) Use multiple threads to compare the source and target. This option will help speed up the comparison time, especially when a CRC/SHA comparison is to be performed.
Multithreaded Sorting: Use multiple threads (8) to sort source and target files. This option is enabled by default. It can be eight times faster than a single-threaded sort.
Number of File Copy/Delete Threads: (Number of threads or Auto) Number of threads to use to copy / delete files. Usually, a higher number of threads results in faster copy and deletion over the network, and fast seek drives (e.g. SSD). Set this value to 'Auto' to let ViceVersa decide the best number of threads to use (see note below). Using multiple threads will also require more resources. A single-thread operation will only use one core on systems with multiple cores, and this is sometimes preferred if reaching the top copy speed is not the main concern.
Notes on 'Auto' Values:
Multithreaded Source Scanning, Multithreaded Target Scanning, Multithreaded Comparison and Number of File Copy/Delete Threads all support 'Auto' as a value. If the value 'Auto' is selected, ViceVersa will decide when to use multiple threads, i.e.:
- Multithreaded Source Scanning and Multithreaded Target Scanning: when set to Auto, multithreaded scanning will be used if the folder to be scanned is over the network, a mapped drive, or a local disk with fast seek access (e.g. SSD).
- Multithreaded Comparison: when set to Auto, multithreaded comparison will be used for CRC comparison or when checking file permissions and source or target are over the network or both drives are fast seek (e.g. SSD).
- File Copy/Delete Threads: when set to Auto, for network and mapped drives, ViceVersa will use 16 threads. When deleting local files, ViceVersa will use as many threads as the number of system cores. To copy files between local disks, ViceVersa uses the number of system cores, if the copy is between different physical devices.
| Offloaded Data Transfers (ODX) support in ViceVersa |
Offloaded Data Transfers (ODX) are supported by the following Windows API functions:
CopyFile
CopyFileEx
MoveFile
MoveFileEx
CopyFile2
https://msdn.microsoft.com/en-us/library/windows/hardware/dn265282%28v=vs.85%29.aspx
To have ViceVersa use the native CopyFileEx Windows API when copying files, enable
the option Use Windows native file copy
in ViceVersa profile settings -> performance / options. With this option enabled, ViceVersa will use offloaded data transfer capabilities if they are available.
| Sometimes Windows Assigns Different Drive Letters to My USB Devices. How Do I Instruct Windows To Always Assign the Same Drive Letter? |
- Insert the USB drive.
- Go to Control Panel ->Administrative Tools -> Computer Management.
- Select Disk Management.
- Select the drive you just inserted and right-click.
- From the context menu that appears, select the option to change the drive letter.
- In the "Change Drive Letter" dialog, select an available letter for the drive. From now on, every time you insert the USB drive, Windows will assign the same drive letter you specified.
| What Are the Main Differences Between ViceVersa PRO and ViceVersa PLUS? |
The old ViceVersa PLUS has been discontinued and it is no longer available.
You can upgrade from ViceVersa PLUS to ViceVersa PRO from here: https://www.tgrmn.com/web/buy.htm
| What Happens If the Connection Drops During Synchronization, Backup or Replication? |
When ViceVersa overwrites an older file with a newer file, first it copies the new file to a temporary file in the destination folder. Only after the copy operation completes successfully, ViceVersa replaces the older file with the temporary file. So, in case of a connection failure only the temporary file is affected. Just run ViceVersa again when the connection is restored, the temporary file will be removed.
| What is a File Conflict? |
During file synchronization a file conflict occurs when a file has changed in both locations (source and target) since the last sync, making it difficult to determine which version should be left unchanged and which version should be updated.
For example, if you've changed a document on your desktop computer since the last synchronization and also made a different change to the same document on your laptop, a file conflict will occur.
ViceVersa PRO (ViceVersa Plus does not track file conflicts) will mark file conflicts in the comparison window with a ** in front of the name and will also report conflicts in the log file and the scheduler, so that you can decide which version you want to keep and which version you want to update.
There is a profile option in ViceVersa PRO to 'Synchronize files even if in conflict (synchronization method)'. When this option is enabled, ViceVersa PRO will synchronize also file conflicts: it will copy the newer file over the older file and rename the older file into filename_[timestamp]_CONFLICT and keep it in the same folder.
| What is the Difference Between One-Way and Two-Way Synchronization? |
In one-way sync, files are copied only from a primary location (source) to a secondary location (target) in one direction, but no files are ever copied back to the primary location. Replication and Backup (=Mirroring) are one-way sync methods in ViceVersa.
In two-way sync, ViceVersa copies files in both directions, keeping the two locations in sync with each other. Synchronization and Consolidation are two-way sync methods in ViceVersa.
You might set up a one-way sync to backup your files to the network, for example, where ViceVersa will copy every new files from your computer to the network but never to copy files in the other direction (from the network to your computer). When files are deleted from your computer they are also deleted from the network.
You might set up a two-way sync between a desktop and a laptop computer, for example, where ViceVersa will copy the newest version of any file it finds to the other location, overwriting any older versions of the same file. This is a good way to sync if you work with the same files on both computers and want to make sure you always have the most recent version of every file you have worked on, no matter which computer you are using.
During a two-way sync, ViceVersa will alert you whenever it finds a conflict, which typically occurs when a file has changed in both locations since the last sync. Rather than overwrite either of the files that have been updated since the last sync, ViceVersa will show the conflict and you can decide which version to keep.
There is also a profile option in ViceVersa PRO called 'Synchronize files even if in conflict (synchronization method)'. When this option is enabled, ViceVersa PRO will synchronize also file conflicts: it will copy the newer file over the older file and rename the older file into filename_[timestamp]_CONFLICT and keep it in the same folder.
| Which Operating Systems Are Supported by ViceVersa? |
ViceVersa PRO supports:
- Windows 11 (All editions. 64-bit*) - ViceVersa PRO 4 or newer
- Windows 10 (All editions. 32-bit and 64-bit*)
- Windows on ARM
- Windows 8.1 (All editions. 32-bit and 64-bit*)
- Windows 8 (All editions. 32-bit and 64-bit*)
- Windows 7 (All editions. 32-bit and 64-bit*)
- Windows Vista (All editions. 32-bit and 64-bit*)
- Windows XP (32-bit and 64-bit*)
- Windows Server 2025 (All editions, 64-bit*) - ViceVersa PRO 4 or newer
- Windows Server 2022 (All editions, 64-bit*) - ViceVersa PRO 4 or newer
- Windows Server 2019 (All editions, 64-bit*)
- Windows Server 2016 (All editions, 64-bit*)
- Windows Server 2012 (All editions, including R2. 64-bit*)
- Windows Server 2008 (All editions, including R2. 32-bit and 64-bit*)
- Windows Server 2003 (All editions, including R2. 32-bit and 64-bit*)
- Windows Small Business Server and Small Business Server 2011 (32-bit and 64-bit*)
- Windows Home Server and Home Server 2011 (32-bit and 64-bit*)
- Windows 2000
- Windows Server 2000
* The ViceVersa PRO installer for Windows 64-bit can be downloaded from here: http://www.tgrmn.com/web/kb/item74.htm
For other operating systems such as Unix, Linux or Netware, as long as the machines running these platforms are visible to the Windows machine, ViceVersa PRO can synchronize and replicate files.
ViceVersa PRO must run on one of the supported operating systems listed above.
| Will ViceVersa Work Over Any Connection Between Two Computers? |
Yes, when you can "see" the source and target folders using Windows Explorer and you can manually copy/move/delete files between the two machines. ViceVersa will have no problem in synchronizing or mirroring the folders. The type of connection is not important. This includes connections such as LAN, WAN, VPN, Bluetooth and also storage media such as external Hard Disks, Network Disks, USB Disks, Zip Drives, USB Keys, CD-R, CD-RW, DVD, etc.
| Windows 64-bit Support |
ViceVersa PRO is available as a 64-bit application for 64-bit Windows, specifically for:
- Windows 11 64-bit (x64) - ViceVersa PRO 4 or newer
- Windows 10 64-bit (x64)
- Windows 8.1 64-bit (x64)
- Windows 8 64-bit (x64)
- Windows 7 64-bit (x64)
- Windows Vista 64-bit (x64)
- Windows Server 2025 64-bit (x64) - ViceVersa PRO 4 or newer
- Windows Server 2022 64-bit (x64) - ViceVersa PRO 4 or newer
- Windows Server 2019 64-bit (x64)
- Windows Server 2016 64-bit (x64)
- Windows Server 2012 R2 64-bit (x64)
- Windows Server 2012 64-bit (x64)
- Windows Server 2008 R2 64-bit (x64)
- Windows Server 2008 64-bit (x64)
- Windows Server 2003 R2 64-bit (x64)
- Windows Server 2003 64-bit (x64)
- Windows Home Server 2011 64-bit (x64)
- Windows Small Business Server 2011 64-bit (x64)
- Windows XP 64-bit (x64)
The special installer for ViceVersa PRO 64-bit can be downloaded here: http://www.tgrmn.com/web/download.htm
Note: The VVEngine add-on is only available as a 32-bit application, but it is fully compatible with Windows 64-bit and it works with both ViceVersa PRO 32-bit and 64-bit More info on VVEngine
Glossary |
| Backup Software |
Backup programs are designed to backup files.
To "backup files" is to make copies of files (replication) and store them on a separate media to be used in case the primary files are lost or corrupted.
ViceVersa replication and archive features are designed to create secure backup copies of files and folders.
Backups are essential for all work. For important work, two or three backup sets are advisable. To be especially safe, backup sets should be kept in different locations. Backup files can be stored compressed and/or encrypted to save space.
| CRC (Cyclical Redundancy Checking) |
CRC is the acronym for Cyclical Redundancy Checking.
It is a type of algorithm known as a "hash". A hash algorithm accepts variable-length input and produces a fixed-length output which uniquely represents the input data. The hash is usually much shorter in length than the data it represents. A sample CRC value for a file could be ADE50E9F. In theory, no other file should produce the same hash value. ViceVersa calculates the CRC value of one file and compares it to the CRC of the corresponding file in the other folder. If the CRCs differ, the files differ. The CRC algorithm is widely used in network protocols and compression programs.
| File Archiving |
During File Synchronization, File Replication, File Mirroring or File Backup, older files are overwritten by newer files or they are deleted if their counterpart has also been deleted.
ViceVersa PRO enables archival of former versions of files which are changed or deleted. This is called the File Archiving feature.
By using File Archiving, when a file is overwritten or removed during a run, the old file is first moved to an archive location, locally or over the network. Files moved to the archive location maintain the original timestamp. The timestamp of when they were moved is also encoded in the file name. Hence, multiple versions of files can be kept for a specified period of time. Extensive options in ViceVersa lets you to control how many versions of each file to keep, where and for how long: you can specify to keep old versions for X days, or up to X copies, or only for certain file names or extensions.
ViceVersa PRO also features an archive viewer tool that lets you browse the archive locations and visualize all the archived file versions.
| File Compression |
With ViceVersa PRO, files in Source and/or Target folders can be compressed to save space.
For example, when backing-up from a PC/Server to an external USB drive, ViceVersa PRO can keep the files on the USB drive compressed. Each file on the USB drive is compressed using the GZIP format.
| File Encryption |
You can instruct ViceVersa PRO to keep files in Source and/or Target encrypted (and compressed). ViceVersa PRO provides AES-256 encryption.
This feature is especially important when copying files to an external USB drive or over the Internet.
For example, if you are using ViceVersa PRO to backup files to a portable USB drive, you can make use of the file encryption feature to keep all the files on the USB drive encrypted.
| File Replication (File Mirroring) |
File Replication (File Mirroring) is a special type of File Synchronization, where:
- Changed files are copied from Source to Target
- New files in Source are copied to Target
Optionally files can be moved from Source to Target, where the source file is deleted after copy.
For more information see File Synchronization.
| File Synchronization |
Synchronization is an adjustment that causes something to occur or recur in unison. Specifically, File Synchronization is an adjustment to files between two (or more) locations with the goal of making sure that the locations contain the same up-to-date files. Locations can be folders on LAN, WAN, VPN, USB drives, USB keys, CD-RW, Zip Disks, etc.
Using this definition File Replication and File Mirroring (Backup) can be classified as special synchronization methods.
ViceVersa supports several File Synchronization methods:
Synchronization (Bidirectional)
This method performs a bidirectional file synchronization between Source and Target.
* All new files/ folders added to Source (single files) are copied to Target
* All new files/folders added to Target (single files) are copied to Source
* All deleted files/folders in Source are deleted from Target
* All deleted files/folders in Target are deleted from Source
* All updated files in Source (newer) are copied over older files in Target
* All updated files in Target (newer) are copied over older files in Source
N.B.: If a file changes both in Source and in Target, the file is in conflict. Conflict files need to be reconciled manually or optionally they can be synchronized automatically with the older file renamed with a timestamp.
Backup (Mirror Source to Target)
This method backs-up Source to Target by creating a mirror/replica of the Source in Target.
* All new files/folders added to Source (single files) are copied to Target
* All deleted files/folders in Source are deleted from Target
* All updated files in Source (newer) are copied to Target
Replication (Augment)
* All new files/folders added to Source (single files) are copied to Target
Replication (Refresh)
* All updated files in Source (newer) are copied to Target (older)
Replication (Update)
* All updated files in Source (newer) are copied to Target (older)
N.B.: Files deleted in Source are NOT deleted from Target. This is different from the Backup method.
Optionally files can be moved to Target, that is, deleted from Source after copying to Target.
Consolidation
This method performs consolidation between Source and Target. This method does not keep track of file conflicts nor file deletions.
* All new files/ folders added to Source (single files) are copied to Target
* All new files/folders added to Target (single files) are copied to Source
* All deleted files/folders in Source are copied back from Target
* All deleted files/folders in Target are copied back from Source
* All updated files in Source (newer) are copied over older files in Target
* All updated files in Target (newer) are copied over older files in Source
| File Verification |
File Verification is the process of verifying that a file has not been changed and/or that two files are identical, bit by bit. ViceVersa supports both types of file verification.
You can verify that files in a specified location have not changed by creating a snapshot of one or more folders at a given time and then re-comparing the folder content with the original snapshot at later time.
You can also verify that two locations have exactly the same files, bit by bit: ViceVersa will calculate the CRC of each file to make sure they are indeed identical. A very important and common task for people working with CD creation is the verification that the data mastered is the same as the original data. For this purpose ViceVersa offers a Cyclical Redundancy Check. With ViceVersa you can determine if even one byte of data differs.
Starting with ViceVersa PRO 3, SHA-256 hash file verification can be used alongside CRC.
| Unbuffered File Copy |
Starting with version 2.5 build 2507, ViceVersa PRO offers the option to perform an unbuffered file copy when copying files. The new option is in profile settings -> performance.
What is unbuffered file copying?
The standard file copying (the default in ViceVersa) caches file reads and writes in the file system memory. This speeds up file reads and writes, but it has an associated memory cost that may impact other applications/processes running on the system while file copying is proceeding. Especially for large files, the memory cost may be significant.
Unbuffered file copying does not cache file reads and writes in the file system memory. It is moderately slower, but it minimizes memory usage. Unbuffered file copying is preferred when copying large files or a large amount of files without impacting the system memory.
The new option Unbuffered file copy is available in ViceVersa PRO starting with version 2.5 build 2507.
This option is supported on Windows 10, 8 / 8.1, 7, Vista, Windows Server 2008, 2012, 2016 or newer. It is not supported on Windows Server 2003, Windows XP, 2000 or older.
How To / Articles |
| About Synchronization (One-Way,Two-Way), Backup and Replication |
File Synchronization (a.k.a. File Sync) is the process of ensuring that two or more locations contain the same, up-to-date, files. If you add, change, or delete a file from one location, the synchronization process will add, change, or delete the corresponding file at the other location.
Synchronization can be two-way or one-way.
Two-Way Synchronization (a.k.a. bi-directional synchronization or both-ways synchronization):
This synchronization process copies files in both directions to reconcile changes as needed. Files are expected to change in both locations. The two locations are considered equivalent.
Example: if a file is newer in Location A, it will be copied to Location B. But if a file is newer in Location B it will be copied to Location A. Similarly, if a file is deleted from Location A, it will be deleted from Location B as well and vice versa.
One-Way Synchronization (a.k.a. file mirroring / file replication / file backup):
Files are expected to change in one location only. To reconcile the changes, the synchronization process copies files only in one direction. The two locations are not considered equivalent. One location is considered the Source and the other is considered the Target. Files are pushed from Source to Target (or files are pulled from Source to Target, but always in one direction only). Source is said to be mirrored to Target.
This creates an exact 1:1 replica of all files in Source to Target. This is very useful and effective for backup purposes since only changed/new files are copied.
Example: If a file is newer in Location A (Source), it will be copied to Location B (Target). But if a file is newer in Location B, it will NOT be copied to Location A. Similarly, if a file is deleted from Location A, it will be deleted from Location B. But a file deleted in Location B is restored using the file in Location A.
 ViceVersa PRO supports several One-Way and Two-Way Synchronization methods: see List of File Synchronization, Backup and Replication Methods Supported by ViceVersa
About Visual Synchronization (Side-by-Side)
With ViceVersa you can synchronize files visually. ViceVersa will compare and analyze the files and folders in two or more locations and show you the files side-by-side, with all the changes that happened since last synchronization clearly marked. Show Me
Automatic Synchronization
File synchronization can be run automatically, without user intervention, at intervals (i.e. every 10 mins, every 2 hours, etc.), scheduled (i.e. Monday and Friday at 7:00), real-time (i.e. as soon as file changes are detected), at startup or at shutdown.
Common Synchronization Scenarios
-
Synchronization between computers connected to the local network (LAN). Computers can be laptops, desktops, workstations, servers. Selected folders across computers are shared, using Windows File Sharing, and synchronized using ViceVersa.
-
Synchronization between computers connected to the Internet (WAN). This requires a VPN tunnel. Computers can be laptops, desktops, workstation, servers. ViceVersa is used to synchronize files over VPN.
-
Synchronization between computers and external (USB) drives.ViceVersa is used to synchronize files to USB devices.
-
Synchronization between computers and NAS.ViceVersa is used to synchronize files to NAS devices.
The end-goal is to make sure that the selected folders on computers and/or drives have the same, most current files.
Synchronization Between Non-Connected Computers
For computers that are not connected to a network, synchronization can be achieved by using a portable USB drive.
If there are files on a computer at home (PC-1) that must be kept synchronized with files on a computer at work (PC-2), synchronization can be achieved by synchronizing PC-1 versus a portable USB drive and then taking the drive to work and performing the same synchronization between PC-2 and the portable USB drive.
At the end of the process the same up-to-date files will be on both PCs (and on the USB drive, useful for data backup purposes). Read More
Additional Features
ViceVersa PRO provides an extensive set of options that allow you to control and customize the synchronization process in detail. Here are some examples:
-
File Archiving. During synchronization, older files (in Source and/or in Target) are not simply overwritten with newer files. Instead, they are moved to an archive location for archiving purposes. Learn More
-
File Verification. ViceVersa calculates the CRC value of a file and compares it to the CRC value of the corresponding file in the other location. If the CRC values differ, the files differ. This ensures that files are copied properly. Learn More
-
File Encryption. ViceVersa can keep files in Source and/or Target encrypted. This is especially important when copying files to an external USB drive or over the Internet. Learn More
-
File Compression. ViceVersa can keep files in Source and/or Target compressed to save space, e.g. on a USB drive or a NAS. Learn More
-
Copy Open Files. ViceVersa can copy files even if they are open and in-use (e.g. Documents, Spreadsheets, E-Mails, Music, etc.). ViceVersa uses the Windows Volume Shadow Service for this. Details
-
Bandwidth and Processor Load Control. You can control the bandwidth used and the max processor load to prevent overloading your system while copying files. Details
- Real-Time Backup, Synchronization and Replication. ViceVersa PRO can backup, replicate and/or synchronize your files continuously, as they are being modified. Files can be saved to another location, such as another computer, a network drive, a USB drive, or even another folder on the same computer. Read More
Further Reading
Common Solutions ViceVersa Provides
Copy / Backup Open Files and Databases Using the Volume Shadow Service
VVEngine: Advanced Scheduling
| Backup / Copy / Mirror "Live" Hyper-V Machines |
*** Requires ViceVersa PRO 2.5 or any later version ***
With ViceVersa PRO you can backup, copy, mirror "live" Hyper-V machines. The Hyper-V machines do not need to be shut-down or stopped: ViceVersa PRO will use the new Windows 2008 VSS Hyper-V writer directly.
There are two ways to copy Hyper-V machines with ViceVersa PRO.
METHOD 1
With this method you specify in the source the path(s) where the machines and virtual hard disks, that are to be copied, are stored. In the target you enter the folder when the machine needs to be copied to. You then need to activate two options in the profile settings:
- Use 'Volume Shadow Copy' to copy open files. This option is in profile settings->advanced settings. ViceVersa PRO will use the Windows Volume Shadow Copy Service to copy files.
- Create Volume Shadow Copy before comparing source and target. This option is in profile settings->advanced settings->details. This is a new option. By default ViceVersa PRO creates Volume Shadow Copies after having compared source and target and just before file copying starts. With this option you can instruct ViceVersa to create the volume shadow copy before source/target comparison. This is necessary for copying files such as Hyper-V machines and SQL/Oracle databases, because the file timestamps for these files are only updated during Shadow Copy creation by their respective VSS writers. Without this option, the timestamps would not be updated and the files would not be copied. Note that this option is not available with the Synchronization method, but it can be used with all other execution methods (that's because a Volume Shadow Copy is read-only).
You then compare source and target and execute the profile normally.
METHOD 2
With this method, you use the new vss:\\ notation directly in the source path and select the VSS Hyper-V writer, or even a specific Hyper-V machine to copy. ViceVersa PRO will select automatically all the files part of that machine for you, including virtual machines configuration files, snapshots, and virtual hard disks. In the target path, you enter the folder where the machine files need to be copied to.
Watch the Video for METHOD 2:
Detailed information is available in this PDF document:![]() BACKING-UP HYPER-V VIRTUAL MACHINES WITH VICEVERSA PRO
BACKING-UP HYPER-V VIRTUAL MACHINES WITH VICEVERSA PRO
| Backup Software for Professionals |
ViceVersa is designed to make backup of your data fast and easy.
Backups are essential for all data. To "backup files" is to make copies of files (replication/mirroring) and store them on a separate media to be used in case the primary files are lost or corrupted. It means that your files are safe and secure. You never know when your hard disk may crash or be attacked by a virus. You can feel secure knowing that ViceVersa has made a backup copy of all your data to a secondary location.
With ViceVersa, you choose where you want to backup your data to. You can backup your data to different types of media such as a USB drives, external hard drives, to the LAN/network, to NAS, to CD/DVD, etc. Backup files can be stored compressed to save space and/or encrypted for security reasons, especially when the backup files are stored on portable hard disks.
ViceVersa PRO makes backup easy by allowing you to create profiles (descriptions of what and where you want to back up your data to). You can schedule backups to run hourly, daily, weekly, it is up to you.
Where older backup tools took hours to backup data, ViceVersa makes backup of your files and folders fast because it detects and copies only those that have changed from the last backup. And with the innovative ViceVersa comparison window, you can clearly see which files have changed, which have been deleted etc.
The PRO version of the ViceVersa software offers a vaste array of options for advanced users: you can control bandwidth and amount of CPU used by the backup process, you can copy files even if they are in use (e.g. Outlook files, Quicken files, SQL/database files, etc.), you can verify file's CRC values after copying to make sure your backup fils are integer, you can run custom scripts before and after the backup opration, you can keep multiple version of backup files (file archiving), run ViceVersa as a service on a server or on a client.
ViceVersa PRO is the perfect backup solution for all users. From single users to corporations, ViceVersa makes securing your data easy, fast and reliable.
| Backup, Replication Over Slow Connections (e.g. VPN, LAN, Network) with No Rescan |
*** Requires ViceVersa PRO 2.5 build 2504 or any later version ***
When backing up files or replicating files over slow connections (such a VPN tunnel or a LAN), a major bottleneck is the re-scanning of the files over the slow side that needs to be done each time the profile runs.
The backup / replication is usually setup between a fast source (the local disk) and a slow target (the folder reachable over the network, VPN, LAN) or from a slow source to a fast target. If the number of files to scan is significant, the ViceVersa profile may spend most of its time performing the scanning of the slow side, rather than copying files. This may be impractical.
To work-around this issue, and to speed up the file comparison/scanning phase, we introduced a new feature in ViceVersa PRO 2.5 build 2504. The new feature is called "no rescan".
When this feature is activated, source or target folders (the slow folders) are only scanned the first time the profile runs or if a certain custom condition is true.
After the first run, ViceVersa assumes that the files in the slow folders have not changed since the last execution and their content is loaded from the tracking database instead.
This significantly speeds-up the comparison and the overall backup process.
How to use the new "No Rescan" options:
The No Rescan options are located in profile settings -> performance / bandwidth. The following options are available:
Do Not Rescan (Source or Target): This option instructs ViceVersa not to rescan the source or the target folders each time. If the source is the slow side (e.g. VPN, LAN, Network folder), set this option to Source. If the target is the slow side, set this option to Target.
When this option is activated, selected folders are only scanned the first time the profile is run or if the rescan condition is true. After the first run, ViceVersa assumes that the files in the folders selected not to be rescanned have not changed since the last execution and their content is loaded from the tracking database instead. Therefore this option requires the tracking database to be enabled (ViceVersa will set one up automatically).
Rescan every X hours : Instructs ViceVersa to perform a full rescan and refresh the file list stored in the tracking database for the slow side every X hours (enter 0 to ignore). Use this option to rescan the slow folders occasionally to make sure no changes have occurred to them, outside ViceVersa, since the last scan.
Rescan if the following condition is true (Rescan Condition): Instructs ViceVersa to perform a new full rescan if the specified condition is true (leave condition blank to ignore). Operators =, <> (not equal), OR, AND, > (greater than), < (smaller than), >= (greater than or equal), <= (smaller than or equal) are supported.
The following variables can be used in the rescan condition:
|
Rescan Condition Variable |
Explanation |
Rescan Condition Examples |
|
dayofweek |
Day of the week (1 = Sunday, 2 = Monday, to 7 = Saturday) |
dayofweek = 1 (performs a rescan on Sundays). |
|
day |
The day of the month, in the range 1 through 31 |
day = 15 OR dayofweek = 1 (performs a rescan on Sundays and on the 15 of every month). |
|
hour |
The current hour, in the range 0 through 23 |
hour >= 0 AND hour <= 7 (performs a rescan between midnight and 7:59 am). |
|
minute |
The current minute, in the range 0 through 59 |
minute > 30 (performs a rescan in the second half of each hour). |
|
month |
The month of the year, in the range 1 through 12 (1 = January, 12 = December) |
month = 1 (performs a rescan in January). |
|
year |
The year, 1970 to 2038 |
year <> 2012 (performs a rescan if the current year is not 2012). |
|
elapsed_days |
The number of days that have passed since the last rescan |
elapsed_days > 7 (performs a rescan if the number of days that have passed since the last rescan is greater than 7. Equivalent to every 7 days). |
|
elapsed_hours |
The number of hours that have passed since the last rescan |
elapsed_hours > 4 (performs a rescan if the number of hours that have passed since the last rescan is greater than 4. Equivalent to every 4 hours). |
|
elapsed_minutes |
The number of minutes that have passed since the last rescan |
elapsed_minutes > 30 (performs a rescan if the number of minutes that have passed since the last rescan is greater than 30. Equivalent to every 30 minutes). |
By using the rescan condition, a rescan can be setup to happen periodically and automatically, for example weekly or overnight.
Other ways to force a rescan:
Beside instructing ViceVersa to perform a full rescan automatically every X hours or when a certain condition is true, a full rescan can also be "forced" in the following manner:
- Manually from the ViceVersa main window, by selecting "Compare with Rescan" or "Compare and Execute with Rescan" (see screen-shot below). Note that these two additional commands are only shown when the option "Do not rescan" is activated in the profile settings.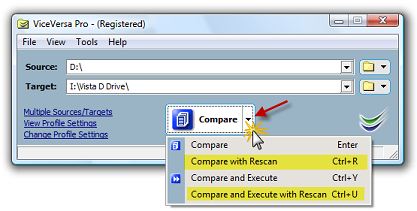
- From the command line using the /rescan flag.
- Manually from VVEngine, by clicking on "Run with Rescan" (requires VVEngine 2.0 build 2.003 or newer). This additional command is only shown in VVEngine when the option "Do not rescan" is activated in the ViceVersa profile settings.
| Bandwidth and Processor Load Control in ViceVersa |
In ViceVersa PRO you can easily control the Bandwidth used and the Processor Load to prevent overloading your system while copying files.
The Bandwidth that ViceVersa PRO uses while copying files can be set as a MB/Sec or KB/Sec max value.
The Processor Load can be set as a percentage of the max CPU speed available.
By using these settings you can setup ViceVersa PRO to work transparently without any impact on the resources of your system.
| Best Way to Sync Files Between 3 Computers (PCs or Servers) |
Given 3 folders on 3 computers (PCs or Servers):
- Computer 1 with Folder A
- Computer 2 with Folder B
- Computer 3 with Folder C
What is the best way to synchronize files between them, using ViceVersa PRO?
The easiest way is to install ViceVersa PRO on one computer (e.g. Computer 1) and setup two ViceVersa profiles, Profile 1 and Profile 2:
Profile 1 synchronizes Folder A on Computer 1 vs. Folder B on Computer 2
Profile 2 synchronizes Folder A on Computer 1 vs. Folder C on Computer 3
Both profiles use the "Synchronization" method.
This setup makes sure that if a file is added or changed at any of the 3 locations, the file will be copied to the other 2 locations.
For example, if a file is added to Folder B on Computer 2, it will be copied to Folder A on Computer 1 by Profile 1. It will then be copied from Folder A on Computer 1 to Folder C on Computer 3 by Profile 2.
Instead, if a file is removed from Folder B on Computer 2, it will be removed from Folder A on Computer 1 by Profile 1. It will then be removed also from Folder C on Computer 3 by Profile 2.
Profile 1 and Profile 2 can be scheduled to run every X minutes, using the VVEngine add-on or VVScheduler (included in the ViceVersa PRO software). The advantage of using VVEngine is that it can run as a service on Windows Servers and it can run profiles sequentially, one after the other.
Note about Real-Time Synchronization
To run the synchronization between the 3 computers in 'real-time' (i.e. not simply scheduled every X minutes, but as soon as file changes are detected), the VVEngine add-on needs to be able monitor file changes on all 3 computers. But it is not always possible to monitor files at remote locations (it depends on the network topology). VVEngine may report an error when trying to monitor a folder on a remote machine (e.g. trying to monitor Folder B on Computer 2 or Folder C on Computer 3 from Computer 1). In this case, VVEngine must be installed locally, on each machine, and 4 ViceVersa profiles must be setup:
Profile 1 on Computer 1 synchronizes Folder A on Computer 1 vs. Folder B on Computer 2. VVEngine monitors source Folder A for file changes.
Profile 2 on Computer 2 synchronizes Folder B on Computer 2 vs. Folder A on Computer 1. VVEngine monitors source Folder B for file changes.
Profile 3 on Computer 1 synchronizes Folder A on Computer 1 vs. Folder C on Computer 3. VVEngine monitors source Folder A for file changes.
Profile 4 on Computer 3 synchronizes Folder C on Computer 3 vs. Folder A on Computer 1. VVEngine monitors source Folder C for file changes.
This setup is only needed to achieve real-time synchronization.
| Common Solutions ViceVersa Provides |
Solutions for Desktop / Laptop
- Keep files and folders in sync between computers. This enables you to work with files on either computer and always be sure you are working with the latest version.
- Create backup replicas of your files to another computer or to a second hard-disk, external hard-disk, USB flash drive, DVD-RW and CD-RW. ViceVersa only copies files that have changed since last run, so backups are really fast. Restore are also very fast and easy, because ViceVersa creates an exact replica of your folders' structures. ViceVersa can also compress and encrypt files for saving disk space and data security on any media, and can keep several former versions of files, using a feature called 'file archiving'.
- Create backup replicas of your files to a network folder, over LAN or VPN.
- "Subscribe" to a network folder, so that the network folder content is "pushed" to your computer every time you run ViceVersa.
- Synchronize several computers against one master network folder. This enables a team to share the same set of files.
Solutions for Servers
- Disk-to-Disk file server backup.
- Backup Exchange and SQL Database.
- Pulling files to a server from workstations. (LAN, VPN)
- Pushing files from a server to workstations. (LAN, VPN)
- Web Server mirroring, aka "Web Farms", i.e. a number of servers providing identical HTML pages to web-users. The web-users' connections are distributed across all the servers (which need to have identical content) for optimized load balance.
Solutions for Data Verification
-
Compare files in two locations to make sure both locations are identical, bit-by-bit. For example, verifying that data stored on a media such as DVD or CD is identical bit-by-bit to the source.
-
Create a snapshot of a folder containing information on folder structure, file timestamps and file CRC, and then later on make sure that the snapshot is still identical to the live folder, which guarantees that the folder content has not changed. Snapshots can be added to DVDs and CDs to periodically verify their integrity.
Solutions for File Compare
-
Visually compare files in two or more locations and see what files have been changed, deleted or added. A unique side-by-side hierarchical view makes it very easy to spot differences.
-
You can use ViceVersa to compare source code, compare program output and validate copies of your files.
-
Use ViceVersa in combination with CompareAndMerge for the ultimate file compare solution.
See also: Network Backup, File Synchronization, Backup and Replication Methods Supported by ViceVersa, About Synchronization (One-Way,Two-Way), Backup and Replication
| Copy / Backup Open Files and Databases Using the Volume Shadow Service |
Now you can copy and backup open files and databases with ViceVersa PRO. This includes Outlook files, Quicken databases, open SQL databases, documents, etc. ViceVersa PRO is now fully integrated with the Volume Shadow Service (VSS) on Windows XP (all editions), Windows Server 2003 (all editions), Windows Server 2008 (all editions), Windows Server 2012 / 2016 / 2019 / 2022 / 2025 (all editions), Windows Vista (all editions), Windows 7 (all editions), Windows 8 / 8.1 (all editions) and Windows 10 / 11 (all editions).
You can activate VSS under Profile Settings->Advanced Settings.
How It Works
-
Before starting a new file copy operation ViceVersa calls the Volume Shadow Service (VSS) and requests the creation of a Volume (=Disk) Shadow Copy for the files to be copied. This is not a full copy of the entire disk, but a differential copy. Hence, its creation will take only a few seconds.
-
Once the Volume Shadow Copy is available, ViceVersa uses it to access the files to be copied.
-
Finally, ViceVersa releases the Volume Shadow Copy.
Advantages
-
By using the Volume Shadow Copy ViceVersa can access and copy files even when they are open, locked or in-use.
-
You can change and work on your files while ViceVersa is copying them. ViceVersa uses the Shadow Copy to access the files, so it will never interfere with your work.
Disadvantages
-
It takes a few seconds to create the Volume Shadow Copy before file copying can start. However, you can set ViceVersa to create the shadow copy only if there are in-use / locked files.
Limitations
-
Works on Windows XP, Windows Server 2003 (all editions), Windows Server 2008 (all editions), Windows Server 2012 / 2016 / 2019 / 2022 / 2025 (all editions), Windows Vista (all editions), Windows 7 (all editions), Windows 8 / 8.1 / 10 / 11 (all editions) or newer.
-
At least one NTFS volume needs to be present locally.
-
The file being copied must be on a local disk, not on a network disk.
-
The account running ViceVersa must have administrator access rights or backup privileges (e.g. member of the Backup Operators group).
-
On Windows 11, 10, 8.1, 8, 7, Vista, Windows Server 2008, 2012, 2016, 2019, 2022, 2025 or newer, if User Account Control is enabled, ViceVersa must be running with elevated privileges (i.e. use the Windows 'Run as Administrator' command). When running from VVScheduler, VVLauncher or VVEngine, they must be running with elevated privileges.
-
Volume Shadow Copies are not possible for CD/DVDs.
Trouble-shooting
-
If you get the message "Can not create shadow copy, access is denied", it is most likely that the account running ViceVersa PRO does not have backup / restore privileges and cannot create shadow copies. On Windows Vista, 7, 8, 8.1, 10, 11, Windows Server 2008, 2012, 2016, 2019, 2022, 2025 or newer, ViceVersa PRO must be running with elevated privileges (i.e. use the Windows 'Run as Administrator' command) to use the Volume Shadow Copy feature. When running from VVScheduler, VVLauncher or VVEngine, they must be running with elevated privileges.
-
Make sure that the Windows Shadow Service is enabled (normally it is already enabled in default installations) or ViceVersa will report an error.
Note: This new feature is integrated in ViceVersa PRO 2 or later. It can be activated in the profile settings. It does not require any additional plug-ins.
| Copy Only New or Changed Files |
I want to copy files and folders from one drive or folder to another drive or folder. However I do not want to copy every file and overwrite existing ones. I just want to copy new or changed files. Will ViceVersa do that?
Yes, ViceVersa will do that automatically. Once you indicate a source and a target folder and then click on "compare", ViceVersa will compare the files and subfolders and show you which files are newer / older / changed. You can then let ViceVersa copy only the new or changed files, saving a lot of time.
| Download and Install ViceVersa |
To install ViceVersa, follow these steps:
- Download the installer file
- If prompted, click "Run" or "Save".
- If you have saved the installer, double-click the installer file to start the installation process.
System Requirements: Windows. details
Notes on the ViceVersa installation:
- ViceVersa does not make any system-wide changes, does not impact or change any other programs or features running on your system.
- For your security, the ViceVersa executable file is digitally signed by TGRMN Software.
- ViceVersa does not collect or transmit any private information.
- ViceVersa is not bundled with any other third-party software.
- ViceVersa does not depend on any other third-party software or library to run and does not require any special hardware to run: if you run Windows you can run ViceVersa too.
- If needed ViceVersa can be removed easily and cleanly from your system, see: Uninstall ViceVersa.
| File and Folder Synchronization with ViceVersa: Benefits |
ViceVersa is a File and Folder Synchronization Tool for Windows. It allows two replicas of files and folders to be stored on different computers or on different disks and media, to be modified separately, and then synchronized, by applying the latest changes in each replica to the other.
Distinctive File and Folder Synchronization Features and Benefits:
- Unlike simple synchronization and mirroring utilities, ViceVersa will deal with changes to both sides (Source and Target) and implement bi-directional synchronization. Files that are not in conflict are copied automatically, conflicting files are detected and displayed.
- Unlike the vast majority of file synchronizers, ViceVersa will visually show changes to Source(s) and Target(s) in a side-by-side, easy to understand display and preview. No more running jobs blindly. And on top of that ViceVersa can also perform synchronization at scheduled times, real-time as soon as changes are detected, at log-on or at log-off.
- Unlike the vast majority of file synchronizers, the ViceVersa file synchronization process is resistant to failure. If connection between Source (s) and Target(s) is lost at any point during synchronization, files will be left in a valid status. We validate this constantly with our "pull-the-plug" test, your data is 100% secure.
- ViceVersa supports encryption and compression of Source(s) and Target(s). A key feature when data needs to be carried or stored remotely. Your data is 100% protected.
- ViceVersa allows users to control total bandwidth and CPU utilization during synchronization. ViceVersa runs in the background silently, you will not notice any performance degradation.
- ViceVersa supports file archiving and file versioning. Instead of removing older files from disk, they can be stored in a separate location for a period of time. Your data is 100% safe from accidental deletion.
File Synchronization Common Uses:
- You use more than one computer and want to keep the same set of files on all computers. Computers can be connected via a LAN, a serial cable, over VPN (Virtual Private Network), with Bluetooth dongles or using a intermediary media (e.g. USB disks and USB memory keys).
- You work in a team and share some files and folders. You can use file synchronization to get and put the latest versions of the documents you are sharing with your team and make them available offline.
- Continuous synchronization of two or more servers to provide load balancing and fail-over: files need to be the same on each server and when one file is updated, it needs to be copied to all other servers.
Keywords: File Synchronization Software, Folder Synchronization Software, Folder Sync, File Sync, Synchronize Files, Synchronize Folders
| File Replication (File Mirroring) with ViceVersa: Benefits |
ViceVersa is a File Replication and File Mirroring Tool for Windows. ViceVersa is designed to replicate a collection of files or folders from one location (=Source(s)), to another (=Target(s)). During each replication, ViceVersa will only copy files that have changed since last time, saving a considerable amount of time.
Distinctive File Replication Features and Benefits:
- When required, ViceVersa will show changes to Source(s) and Target(s) in a side-by-side, easy to understand display. No more running of jobs blindly.
- The ViceVersa replication process is resilient to failure. If the connection between Source (s) and Target(s) is lost at any point during replication, files will be left in a valid status. We validate this constantly with our "pull-the-plug" test. Your data is 100% protected.
- ViceVersa supports encryption and compression of Source(s) and/or Target(s). A necessary feature when data needs to be moved over the web or replicated remotely. Your data is 100% safe.
- ViceVersa allows users to control the bandwidth and the CPU power to be utilized during replication. ViceVersa silently runs in the background. You will not notice any performance degradation.
- ViceVersa supports file archiving and file versioning. Instead of removing older files from disk, they can be moved to a separate location for a period of time. Your data is 100% protected from accidental deletion.
- Successful file copy can be verified using CRC, which compares files bit-by-bit.
- NTFS file and folder permissions can also be replicated.
- Variable Path Selection inserts variables into the source or target path to create unique replications based on these variables.
- Replication can occur on demand, scheduled, as soon as file changes are detected, at log-on or at log-off.
- Replication can be performed as a Windows Service.
File Replication Common Uses:
- Continuous file backup and file mirroring to a separate location, such as to a network hard disk, a NAS, CD-RW, LAN, another PC, server or storage device.
- Server backup to another server.
- Continuous one-to-one or one-to-many replication of two or more servers to provide load balancing and fail-over. Files need to be the same on each server and when one file is updated, it needs to be pushed to all other servers.
- Distribution of files from a server to workstations / laptops (push).
- Backup of workstations / laptops to a server (pull).
Keywords: File Replication, File Mirroring, Replicate Files, Replicate Folders, Mirror Folders, Mirror Directory
| File Replication / File Synchronization and the impact of Ransomware |
Problem
Certain types of malicious software, called Ransomware, encrypt a victim's files, making them inaccessible, and then demand a ransom payment to decrypt them. Ransomware attacks are typically carried out using a Trojan that is disguised as a legitimate file that the user is tricked into downloading or opening when it arrives as an email attachment. However, one high-profile example, the "WannaCry worm", propagated automatically between computers over the network without user interaction, using an exploit of the Windows' Server Message Block (SMB) protocol that was sub-sequentially fixed.
Ransomware typically encrypts files and renames them too, usually by changing their file extension, but not always. There are types of Ransomware which do not change file names or extensions. The file size usually does change as the file content is encrypted. This creates some issues for file replication and synchronization when the encrypted files are replicated and/or synchronized.
There are two main scenarios:
a) The Ransomware does change file names or extensions. The file replication or synchronization process will copy the new renamed files and, depending on other profile settings, might delete the old good files.
b) The Ransomware does NOT change file names or extensions but only the file contents. The replication or synchronization process will consider these as changed files and copy them over the old files.
In both scenarios, there are issues that the Ransomware will create to the file replication and synchronization process.
Mitigation of the issues
Possible mitigating steps include:
1. If file replication is used for backup purposes, it is recommended to use a rotating target, e.g. use a different target every day of the week (see Folder Variables in ViceVersa PRO which can change automatically the target path of the profile based on day of the week and other variables). Also it would be best if the replicated data is kept offline / archived when not in-use. For example, replicating to a different removable disk each day or each week, and disconnecting the disk when not in use. Additionally, files should be replicated frequently and in real-time if possible so that even very recent files have a good replica.
2. Enable the file archiving feature of ViceVersa. When file archiving is enabled in the profile settings, files are not simply overwritten or deleted, instead they are moved to an archive folder from which they can be restored if needed.
3. Use the two profile options Max. files/folders to delete, do not execute if more and Max. files/folders to update (=overwrite), do not execute if more. When these options are used, replication or synchronization will stop, should it result in more than X files/folders updated or deleted and return an error. No files at all will be copied or deleted and execution is aborted before the copy/delete process even starts. The amount can be specified as a number, for example 100, or as percentage, for example 10%. These two options can be useful because Ransomware usually encrypts many files in a short period of time and in this case the replication / synchronization will not run at all and the unencrypted files in the target will be safe guarded.
Conclusion
File replication and synchronization can be impacted by Ransomware as the encrypted files are replicated / synchronized and the good unencrypted files might be deleted or replaced with the bad copies. There are mitigating steps that can be taken in ViceVersa to reduce the impact of Ransomware on file replication and synchronization.
| How Does Scan Acceleration Work? |
Scan Acceleration is a new feature available since ViceVersa PRO version 5.
With Scan Acceleration, you can speed up the folder scanning phase of a profile significantly in certain scenarios. The scanning phase is when all the information is collected from Source and Target folder(s) to initiate the comparison and then to work out which files or folder need to be copied, based on their attributes / timestamps and based on the selected execution method in ViceVersa.
It can take a significant amount of time to scan all files - if there are a lot of files to scan. Scan Acceleration can make that a lot faster, up to 10 times faster, in some cases.
How Scan Acceleration Works
Scan Acceleration builds an index of the drive before the actual scanning occurs. The index will make the scanning faster. The index is kept in memory during the scanning phase, and it is then deleted once done.
Requirements to Use Scan Acceleration
To use Scan Acceleration, the following requirements must be met:
1. ViceVersa must be running by a user with Administrative Privileges ("as Administrator"). Some USB drives can be indexed without Administrative Privileges, but generally Administrative Privileges are required. VVEngine and VVLauncher always run with Administrative Privileges. To run ViceVersa as administrator, right-click on the ViceVersa icon / program and select "Run as Administrator".
2. The drive to be indexed must be a Local Drive, e.g. an internal HDD, SSD or an external drive (USB, etc.). Drives over the network, cloud, or mapped drives are not supported for Scan Acceleration.
3. The drive must be formatted as NTFS. This is the default file system on Windows. HFS, FAT, exFAT, EXT and all other file system types cannot be indexed, so Scan Acceleration will not be possible. In ViceVersa select View->Drive Information from the main menu to view the file system of each drive that is present on the system.
How to Enable Scan Acceleration
The Drive Indexing / Scan Acceleration option is in Profile Settings->Folders in ViceVersa. Click on the link 'Set Drive Indexing Options (Scan Acceleration)'. A dialog box will open where you can enable Scan Acceleration for Source, for Target or for both. When you then run the profile, ViceVersa will use Scan Acceleration for Source, Target or both as specified. If Scan Acceleration cannot be used, because the drive does not support it, ViceVersa will advise with a warning. If multiple folders in the
same profile are all on the same drive, the drive will be indexed only once.
Scan Acceleration and Volume Shadow Copies
Scan Acceleration can also be used with Volume Shadow Copies. If you are using the option "Use 'Volume Shadow Copy' to copy open files" in Profile Settings -> Advanced Settings, then you can enable Scan Acceleration.
Scan Acceleration Use Cases
- Accelerate mirror / sync / replication of files between two USB drives (both formatted as NTFS)
- Accelerate mirror / sync / replication of files between two local HDD / SDD or from HDD / SDD to or from USB drive (all formatted as NTFS)
- Accelerate mirror / sync / replication of files between local HDD / SDD / USB drive to network path (scan acceleration enabled for local drive formatted as NTFS)
- Accelerate mirror / sync / replication of files between HDD / SDD / NAS (all formatted as NTFS)
| How to Check the SMB Version of Your Network Connection |
There are several different versions (or dialects) of the SMB protocol that were introduced with different versions of Windows:
SMB 1 - Windows 2000
SMB 2 - Windows Server 2008 and Windows Vista SP1
SMB 2.1 - Windows Server 2008 R2 and Windows 7
SMB 3.0 - Windows Server 2012 and Windows 8
The version of SMB used between two computers will be the highest dialect supported by both.
This means if a Windows 8 machine is talking to a Windows 8 or Windows Server 2012 machine, it will use SMB 3.0. If a Windows 10 machine is talking to Windows Server 2008 R2, then the highest common level is SMB 2.1.
To check which SMB version is being used over a connection between two computers, run the following PowerShell command:
Get-SmbConnection
which will show the SMB connections and the dialect that is being used.
PS C:\Windows\system32> Get-SmbConnection
ServerName ShareName UserName Credential Dialect NumOpens
---------- --------- -------- ---------- ------- --------
ser08r2 c$ SAVILLTEC... SAVILLTEC... 2.10 1
serv01 c$ SAVILLTEC... SAVILLTEC... 3.00 1
ser2016 softsh SAVILLTEC... SAVILLTEC... 3.00 1
To check if encryption is enabled or not over a connection you can use this command:
PS C:\Users\Administrator> Get-SmbConnection | Select-Object -Property *
ContinuouslyAvailable : False
Credential : domain\administrator
Dialect : 3.00
Encrypted : False
NumOpens : 3
ServerName : server1
ShareName : test
UserName : SERVER1\Administrator
PSComputerName :
CimClass : ROOT/Microsoft/Windows/SMB:MSFT_SmbConnection
CimInstanceProperties : {ContinuouslyAvailable, Credential, Dialect, Encrypted...}
CimSystemProperties : Microsoft.Management.Infrastructure.CimSystemProperties
Once you know a connection to a share in SMB3 is encrypted you know all traffic will be encrypted between the two computers over that share, including ViceVersa and VVEngine. There are no special settings needed in ViceVersa or VVEngine.
| How To Copy / Replicate Just the Folder Structure Without Files |
To copy just the folder structure between two locations without any files, for example from folder c:\source to folder d:\target\, create a ViceVersa profile with :
Source: c:\source
Target: c:\target
Include Subfolders: Yes
File Filter: Exclude * (this filter will exclude all files)
Subfolder Filter: Include ** (this filter will force inclusion of all subfolders)
Execution Method: Replication (Update Target)
Note that by default ViceVersa PRO automatically excludes all subfolders that contain only excluded files. For example, if a subfolder contains 5 documents, which have file extension .doc, and the profile settings exclude all files with extension .doc , then ViceVersa PRO will exclude the subfolder X too, automatically. But this default behavior can be overridden by adding an include subfolder "**" as the first subfolder filter (double *, without surrounding ") as shown above. With this special filter, subfolders containing only excluded files will not be excluded and the replication will be able to just copy the folder structure without the files inside.
| How to Copy Share Information between Servers |
ViceVersa PRO has an option in the profile settings to copy, mirror, check and also verify all files and folders, with their associated NTFS permissions, from a Source folder on a server to a Target folder on another server.
Once the data copy is done and all files and subfolders with their permissions have been mirrored and verified to be matching, network folder share information might needed to be applied from the Source server to the Target server.
However, the share information is actually stored in the Windows Registry not on files or folders. To copy share information from a server to another server, a key in the Windows Registry needs to be exported and imported in the new server.
The simple method below will show you how to copy all the shares and share security from one server to another. It involves exporting a Windows Registry key to a file and then importing this file into the new server.
If possible, try to keep the drive letter the same on your new server compared to where the shares were on your old server. If you cannot, this can be changed later with an extra step.
Step 1
On your old server, export the following Windows Registry key to a file using the program Regedit.
HKEY_LOCAL_MACHINE>SYSTEM>CurrentControlSet>
Services>LanmanServer>Shares
This registry key lists all the shares that are present. Right click the Shares key and select Export in Regedit. Give it any name you like and save it to an area accessible from your new server.
Step 2
Now go to your new server and right click the registry file you have exported in Step 1 and select Merge. All the share information will be imported in your new server. If the new server uses the same drive letter, then just restart the server (or you can start and stop the Server service: enter Net Stop Server and then Net Start Server at the command prompt).
Step 3
If the drive on the new server where the Shares are has a different drive letter compared to the old server, then you need to do the following. On the new server, navigate to the same key using Regedit:
HKEY_LOCAL_MACHINE>SYSTEM>CurrentControlSet>
Services>LanmanServer>Shares
Now on the right hand side you can see the Shares. To change the drive letter of a share simply double click the share in question and then locate the section labelled path and change the drive letter to the drive letter of your new file server.
You will need to do this for each share that needs a change of drive location. Once completed, you will just need to restart the server again.
| How to Setup and Use a GMAIL or OUTLOOK Account for ViceVersa E-Mail Notifications |
Information on how to setup and use a GMAIL or OUTLOOK account for ViceVersa E-Mail Notifications: How to Setup and Use a GMAIL or OUTLOOK Account for ViceVersa E-Mail Notifications.pdf
| How to Shutdown Windows Automatically After a ViceVersa Profile Has Run |
- Create a file called run_and_shutdown.bat on the desktop. This type of file is a batch file. You can use any file name, but the file extension needs to be '.bat'
- Open the file with Notepad.exe and edit the file.
- Add the following 2 lines:
Start "ViceVersa" /b /wait "C:\Program Files\ViceVersa Pro\ViceVersa.exe" "C:\Users\Administrator\Documents\ViceVersa PRO\profile1.fsf" /autoexec /autoclose (from 'Start' to '/autoclose' all on the same line)
shutdown /s
where:
-
C:\Program Files\ViceVersa Pro\ViceVersa.exe is the path of ViceVersa.exe
-
C:\Users\Administrator\Documents\ViceVersa PRO\profile1.fsf is the path of the ViceVersa profile you want to run automatically.
- Save the file.
Double-clicking on the newly created batch file will start ViceVersa and run the profile. When finished Windows will shutdown.
Notes:
The /autoexec and /autoclose flags instruct ViceVersa to automatically run the profile and close. Additional ViceVersa command line options are explained in the ViceVersa help file.
The Windows shutdown command 'shutdown' also supports additional options that are listed by typing shutdown /? on the windows command line prompt.
| List of File Synchronization, Backup and Replication Methods Supported by ViceVersa |
ViceVersa supports the following Synchronization, Backup and Replication methods:
Synchronization (Bidirectional) - ViceVersa PRO only
This method performs a two-way file synchronization between Source and Target. New and updated files are copied both ways. Renames and deletes on either side are repeated on the other. Details:
* All new files/ folders added to Source (single files) are copied to Target
* All new files/folders added to Target (single files) are copied to Source
* All deleted files/folders in Source are deleted from Target
* All deleted files/folders in Target are deleted from Source
* All updated files in Source (newer) are copied over older files in Target
* All updated files in Target (newer) are copied over older files in Source
N.B.: If a file changes both in Source and in Target, the file is in conflict. Conflict files need to be reconciled manually or optionally they can be synchronized automatically with the older file renamed with a timestamp.
Backup (Mirror Source to Target)
This method will backup Source to Target by creating a mirror/replica of the Source to the Target. New and updated files are copied from Source to Target. Renames and deletes from the Source are repeated to the Target. Details:
* All new files/folders added to Source (single files) are copied to Target
* All deleted files/folders in Source are deleted from Target
* All updated files in Source (newer) are copied to Target
Replication (Augment)
* All new files/folders added to Source (single files) are copied to Target
Replication (Refresh)
* All updated files in Source (newer) are copied to Target (older)
Replication (Update)
* All updated files in Source (newer) are copied to Target (older)
N.B.: Files deleted in Source are NOT deleted from Target. This is different from the Backup method.
Optionally files can be moved to Target, that is, deleted from Source after copying to Target.
Consolidation
This method performs consolidation between Source and Target. This method does not keep track of file conflicts or file deletions.
* All new files/ folders added to Source (single files) are copied to Target
* All new files/folders added to Target (single files) are copied to Source
* All deleted files/folders in Source are copied back from Target
* All deleted files/folders in Target are copied back from Source
* All updated files in Source (newer) are copied over older files in Target
* All updated files in Target (newer) are copied over older files in Source
| Network Backup |
It is easy to backup files and folders with ViceVersa for users on a computer network. It is a fast and reliable backup solution whether it is for two users or thousands of users. It is perfect for home users who work in a network environment and for companies with many users whose data they want to secure.
ViceVersa can backup multiple users data or profiles (name you give to the descriptions of what and where you want to back up your data to) that are connected to the network at the same time.
Key Features:
-
Copy files between two or more locations on the network very quickly, only files that have changed since last backup are copied
-
Copy open files and locked databases using Volume Shadow Copy
-
Schedule ViceVersa to run unattended, as soon as file changes are detected, at start-up and shut-down
-
No limit on data size or file size
-
Run custom scripts before / after network backup
Retry on network error(s)
-
Encryption, compression, bandwidth control, archiving, password protection, CRC verification, file permissions and much more! View Complete List of Features
Backup from Clients to a File Server over the Network
Backup from Servers to a Backup Server over the Network and then to an External Hard Drive
ViceVersa is the perfect network backup solution for users on a computer network whether that be two users or thousands of users. For corporate licensing enquiries, please contact sales@tgrmn.com
| Processing a Large Amount of Files Using Multiple Profiles |
*** Requires ViceVersa PRO 3 or any later version ***
When processing a large amount of files (e.g. more than one million files) it is recommended to enable the profile settings option "Minimize Memory Usage" and also setup multiple profiles. Using multiple profiles makes the data more manageable and uses less memory.Subfolder filters (and/or file filters as needed) help select which subfolders to include in which profile.
*** Example 1 (split into 2 profiles) ***
Need to Replicate, Backup or Sync:
----------------------------------
Source: c:\SourceFolder\
Target: X:\TargetFolder\
Profile A
---------
Source: c:\SourceFolder\
Target: X:\TargetFolder\
Include Subfolder Filter \[a-n]* - Case Sensitive: No
(This filter includes only all level-1 subfolders with names starting with a to n)
Profile B
---------
Source: c:\SourceFolder\
Target: X:\TargetFolder\
Exclude Subfolder Filter \[a-n]* - Case Sensitive: No
(This filter excludes all level-1 subfolders with names starting with a to n)
Profile A + Profile B combined will replicate / backup / sync all files from c:\SourceFolder\ to X:\TargetFolder\
Profiles can be run sequentially using VVEngine.
*** Example 2 (split into 3 profiles) ***
Need to Replicate, Backup or Sync:
----------------------------------
Source: c:\SourceFolder\
Target: X:\TargetFolder\
Profile A
---------
Source: c:\SourceFolder\
Target: X:\TargetFolder\
Include Subfolder Filter \[abcdefg]* - Case Sensitive: No
(This filter includes only all level-1 subfolders with names starting with a, b, c, d, e, f or g)
Profile B
---------
Source: c:\SourceFolder\
Target: X:\TargetFolder\
Include Subfolder Filter \[p-z]* - Case Sensitive: No
(This filter includes only all level-1 subfolders with names starting with p to z)
Profile C
---------
Source: c:\SourceFolder\
Target: X:\TargetFolder\
Exclude Subfolder Filter \[p-z]* - Case Sensitive: No
(This filter excludes all level-1 subfolders starting with p to z)
Exclude Subfolder Filter \[abcdefg]* - Case Sensitive: No
(This filter excludes all level-1 subfolders starting with a, b, c, d, e, f or g)
Profile A + Profile B + Profile C combined will replicate / backup / sync all files from c:\SourceFolder\ to X:\TargetFolder\
Profiles can be run sequentially using VVEngine.
Instead of subfolder filters, file filters can be used to target individual files.
| Real-Time Backup, Synchronization and Replication |
Many backup and synchronization solutions only work when scheduled or on demand. But what if something happens to the documents and files you are currently working on and the last backup only ran last night? You may have spent hours working on important documents and suddenly there's a power outage. Your documents are lost.
If you setup ViceVersa PRO to backup, replicate or synchronize files in real-time this won't be a problem.
ViceVersa PRO can backup, replicate or synchronize your files continuously, while they are being modified. Files can be saved to another location, such as another computer, a network drive, a USB drive, or even another folder on the same computer. ViceVersa PRO monitors files for changes in the background, using very little system resources. As soon as a file change is detected, the file is saved to the secondary location.
Real-Time Backup is also known as Continuous Data Protection (CDP). Traditional backups can only restore data to the point at which the backup was done. With continuous data protection, there are no backup schedules. When data is written to disk, it is also written to a second location, usually an external USB drive, a NAS or another computer over the network.
With ViceVersa PRO setup in real-time you will always have a mirror copy of all your files. You can combine this feature with File Archiving to keep an archive copy of previous versions of your files.
Real-Time File Replication: replicate a single change in a million files without delay
| Synchronization vs. Backup / Mirroring / Replication |
Synchronization, Backup, Mirroring and Replication are all methods of copying files between 2 or more locations / folders.
Synchronization potentially copies files in either direction, while Backup, Mirroring and Replication always copy files in one direction (a.k.a. \'pushing files\').
ViceVersa uses the modification timestamp of files to determine which files are newer. All methods copy only those files that are different. This means that repeating a backup will not copy any files, if no files have changed.
Further Reading:
| Synchronize Files and Folders: Step by Step |
It is very easy to synchronize files and folders with ViceVersa PRO.
This article shows how to use ViceVersa PRO for visual file synchronization. Beside visual file synchronization, ViceVersa can also be setup to run on-demand, at scheduled times, every x minutes, or continuously, while monitoring files for changes.
Step 1: Select Source and Target folders.

Step 2: Click the 'Compare' button. The Comparison Window opens. Files and folders are shown side-by-side. Files are clearly marked as newer, older, added or removed since the last synchronization.
Step 3: Select 'Synchronization' as execution method (or Backup, or Replication) and then click the 'Execute' button.
Done! Your source and target folders are synchronized.
Note that all your settings can be saved to a file for the next time you start ViceVersa.
You can also copy / delete individual files or group of files by using the context menu (right mouse-button click over a file)
| Synchronize Files Between Computers Not Connected |
For computers that are not connected to a network, file synchronization can be achieved using a portable USB drive.
The objective is to synchronize files between a computer at home (Computer 1) and a computer at work (Computer 2), as shown in this illustration.
File synchronization is achieved in 2 steps:
- First synchronizing files on Computer 1 vs. a folder on the portable USB drive (1)
- Then using the USB drive at work and performing the same synchronization between the files Computer 2 and the same folder on the portable USB drive (2)
At the end of the process the same up-to-date files will be on both computers and on the USB drive, useful for backup purposes.
Steps 1 and 2 are repeated each time a synchronization is needed between the two computers.
| Uninstall ViceVersa |
You can remove ViceVersa like any other Windows program. The uninstall procedure will completely and cleanly remove ViceVersa from your computer.
Follow these steps:
Windows 11, Windows 10, Windows 8, Windows 7, Windows Vista, Windows Server 2025 / 2022 / 2019 / 2016 / 2012 / 2008
- Close ViceVersa (and the VVLauncher scheduler if running).
- Go to the Start menu > Control Panel. (Learn how to access the Control Panel)
- Click Programs and Features.
- Double-click ViceVersa.
- Click Yes when asked to confirm that you want to uninstall ViceVersa.
- The uninstall procedure will completely and cleanly remove ViceVersa from your system.
Windows XP, Windows Server 2003, Windows Server 2000
- Close ViceVersa (and the VVLauncher scheduler if running).
- Go to the Start menu > Control Panel.
- Click Add or Remove Programs.
- Double-click ViceVersa.
- Click Yes when asked to confirm that you want to uninstall ViceVersa.
- The uninstall procedure will completely and cleanly remove ViceVersa from your system.
| Use ViceVersa to Mirror / Sync the Local OneDrive Folder to Another Location |
To mirror / copy / replicate / sync the local OneDrive folder to another location, make sure to enable the following options in the profile settings:
Do Not Copy File / Folder Data Streams
Option is in Profile Settings -> Advanced Settings -> Details
OneDrive adds some additional file streams to files and makes them inaccessible.
If you do not enable this option you might get the error: "Can not copy NTFS Additional File Streams of file "XXXXX". Function 'BackupWrite' returned error 395. Access to the cloud file is denied".
Include Offline Files
Option is in Profile Settings -> Advanced Settings -> More Settings
If there are some files in the OneDrive folder which are stored only in the cloud and not locally (i.e. they are 'offline'), then ViceVersa will exclude these files from copy because they are not present on the local disk. If you want to copy these offline files too, enable this option. The offline files will be downloaded to the local folder by OneDrive.
Exclude System Files
Option is in Profile Settings -> Folders -> File Filters
OneDrive adds a private and unique system file such as ".849C9593-D756-4E56-8D6E-AAA42412F" to the root folder and marks it as system and inaccessible. To avoid an error in ViceVersa, you can exclude this file from replication/synchronization by excluding all system files (or excluding the specific file name).
Purchasing / Ordering / Registering |
| After Purchase, When Do I Receive the Registration Key? |
Paying by Credit Card
After we receive your online credit card order and the charge is authorized, you will receive an e-mail with the Registration Key. Most transactions are immediate, however it may take a few hours to authorize the transaction in some cases.
In the unlikely event that your credit card is declined, you will receive an e-mail stating the reason for this.
If you do not receive any e-mail within 24 hours, please contact us at sales@tgrmn.com with your name and the approximate date and time of your order to obtain the status of your order.
Other Payments (Wire Transfer, Check, Pro-Forma)
The Registration Key is sent via e-mail once the payment is received.
| Can I Try ViceVersa Before I Buy? |
Yes, you can download ViceVersa for a free 30-day trial. The trial download is fully functional.
After the trial period ends, you will need to purchase one or more licenses.
If you do not wish to purchase after evaluation, the included uninstall routine will completely and cleanly remove ViceVersa from your computer.
| How Do I Buy / Order ViceVersa? |
You can order ViceVersa from our website paying with Credit Card, PayPal, Check, Wire Transfer, ACH and more.
When we receive your order, we send you a Registration Key via E-mail. You then enter the Registration Key in the ViceVersa trial that you have already downloaded and installed on your computer. ViceVersa will unlock and become registered in your name.
| How Do I Enter the Registration Information in ViceVersa? |
Once you have received the registration information from us, you will need to enter it in ViceVersa. The easiest option is to copy and paste the information directly from the e-mail.
Step-by-Step Instructions:
1. Start ViceVersa
2. Select "Enter Registration Information" (from the starting dialog or from the help menu, this depends on which ViceVersa version you are running)
3. The "Enter Registration" dialog box will open.
4. In the E-Mail we sent, you will find a code like this one below:
REGISTRATION TEXT: [ Paul-Sand-1-Lic-Order7-paul@sand.com ]
REGISTRATION KEY: [ 186-684-155667 ]
Paste the two values into the corresponding fields in ViceVersa.
*** Paste the entire string, exclude the [ ] ***
In the above case you would paste:
Paul-Sand-1-Lic-Order7-paul@sand.com into the TEXT field
186-684-155667 into the KEY field
Additional Notes:
* Sometimes the registration text may span across 2 lines of E-Mail. In that case you need to merge and copy both lines.
Example:
REGISTRATION TEXT: [ Paul-Sand-1-Lic-Order7-pa
ul@sand.com ]
REGISTRATION KEY: [ 186-684-155667 ]
In the above case you would still paste:
Paul-Sand-1-Lic-Order7-paul@sand.com into the TEXT field
186-684-155667 into the KEY field
* In ViceVersa Plus the "text" field is called "name".
* Make sure that you enter the code in the correct version of ViceVersa. If you purchased ViceVersa Plus the code is only valid for the Plus version, if you purchased ViceVersa Pro the code is only valid for the PRO version.
For further queries, please contact support@tgrmn.com and include your registration text/key, the error code returned and any relevant order detail information.
| How Does 'Try-Before-Buy' Software Work? |
'Try-before-buy' software allows you to evaluate applications such as ViceVersa to see if they suit your needs.
You can try the fully-functional ViceVersa for free for 30 days.
Download free from www.tgrmn.com
After this trial period, if you wish to continue to use ViceVersa, you must place an order for the number of licence(s) you require. We then send you the Registration Key via e-mail that you can enter in ViceVersa to unlock the program. There is no need to download or install additional software.
| How Much Does ViceVersa Cost? |
A ViceVersa PRO license for Windows 11, 10, 8.1, 8, 7, Vista, XP, 2000 costs $72.95 (US$).
A ViceVersa PRO server license for Windows Server 2025, Windows Server 2022, Windows Server 2019, Windows Server 2016, Windows Server 2012 (R2), Windows Server 2008 (R2), Windows Server 2003 (R2), Windows 2000 Server, Windows Home Server, Windows Small Business Server (SBS) costs $189.95 (US$). Each server participating in the synchronization, backup, replication requires its own server license.
A server PREMIUM license with extended VSS support costs $249.95 (US$).
The ViceVersa PRO licenses are NOT an annual subscription. They are a one-time payment. Priority support and maintenance plan can be added as an option in the cart.
See Buy Page for all pricing options, including multi-license discounts.
| I Ordered, but I Have Not Received My Registration Key. |
When you order online via our secure server, your key is automatically generated and sent to the e-mail account that you specified on the ordering form. Usually this takes a few minutes, sometimes up to 1 hour.
If you do not receive our e-mail within 3 hours, please check the following:
- You entered your "other" e-mail account when you ordered.
- Your spam filter killed the e-mail.
- You have a spam blocking service and the e-mail with code is stuck in a queue somewhere.
You can also contact us at sales@tgrmn.com. We will be happy to re-send your registration key.
| Which Credit Cards Do You Accept? |
We accept all major Credit Cards: Visa, MasterCard, American Express, Diners Club, Discover, JCB, etc.

| Who Will Be Handling My Order? |
Your order will be fulfilled by TGRMN Software.
To enhance our payment processing capabilities, we have partnered with Stripe, a leading payment gateway provider.
Secure Transactions: Stripe employs advanced security measures to protect your payment information.
Multiple Payment Options: You can choose from various payment methods, including credit/debit cards and digital wallets.
Faster Checkout: Enjoy a streamlined checkout process for quicker and easier transactions.
Privacy and Security: Your privacy is important to us. When you make a payment, your information will be handled in accordance with Stripe privacy policy and our own. We do not store your credit card information.
For Questions or Concerns: If you have any questions regarding a change or about your payment processing, please feel free to reach out to our customer support team at support@tgrmn.com
Scripts |
| E-MAIL Script: Sends E-Mail Notification After Running a Profile |
This is a Visual Basic script which sends an e-mail notification after a profile run. You can install this script by following the 5 easy steps below:
- Save the ViceVersa PRO E-Mail Script to your ViceVersa "GlobalScripts" folder, under the ViceVersa PRO 2 installation folder (usually 'C:\Program Files\ViceVersa PRO2\GlobalScripts'). If you do not have the GlobalScripts folder, you need to update to the latest version of ViceVersa PRO 2.
- Open the script with NotePad.
- Edit the 5 variables at the beginning of the script USERNAME, PASSWORD, FROM_EMAIL, TO_EMAIL , SMTP_EMAIL_SERVER
- Save the script.
- Activate the option "Run custom scripts after execution" in the advanced profile settings for all the ViceVersa PRO profiles you want to receive an e-mail for.
Notes:
- By default the script will send an email only if an error occurs. You can change this default behavior by setting the variable SEND_EMAIL_ONLY_IFERROR to FALSE. Then the script will always send an e-mail at the end of a profile execution.
- You need ViceVersa PRO 2 Build 2011 or newer for this script to work.
The following is an example of an e-mail sent by the script.
Result: OK
Profile: My Documents - backup
Exit Code: 0
Source: C:\Documents and Settings\User\My Documents\ | C:\Documents and Settings\User\Desktop\
Target: \\nas\winXP-ibm\My Documents\ | \\nas\winXP-ibm\Desktop\
User: Romeo
Computer Name: IBM-LAPTOP
Backup (Mirror Source to Target)
- Run Summary -
- Added Files - Source: 0 (0) - Target: 163 (16.73MB)
- Updated Files - Source: 0 (0) - Target: 11 (8.02MB)
- Deleted Files - Source: 0 (0) - Target: 0 (0)
- Added Subfolders - Source: 0 - Target: 14
- Deleted Subfolders - Source: 0 - Target: 0
- Archive Information -
- Files Added to Archive - Source: 0 (0) - Target: 10 (7.30MB)
- Files Deleted from Archive - Source: 0 (0) - Target: 2 (8.04KB)
- Final Status -
- Total Files - Source: 2,323 (1.98GB) - Target: 2,323 (1.98GB)
- Excluded Files - Source: 0 (0) - Target: 0 (0)
- Matched Files - Source: 2,323 (1.98GB) - Target: 2,323 (1.98GB)
- Single Files - Source: 0 (0) - Target: 0 (0)
- Newer Files - Source: 0 (0) - Target: 0 (0)
- Older Files - Source: 0 (0) - Target: 0 (0)
- Total Subfolders - Source: 224 - Target: 224
- Excluded Subfolders - Source: 0 - Target: 0
- Matched Subfolders - Source: 224 - Target: 224
- Single Subfolders - Source: 0 - Target: 0
| Global and Local Scripts in ViceVersa PRO |
Since Version 2, Build 2011, ViceVersa PRO supports local and global scripts. Scripts can be setup to run before and/or after a profile execution.
Typically scripts before profile execution are run to prepare the computer environment. For example, mapping a network drive or connecting to a network resource. Instead, scripts after profile execution are run to disconnect from the network or to report, e.g. via e-mail, the results of a synchronization or a backup.
Scripts can be Visual Basic scripts (*.vbs), batch files (*.bat, *.cmd) or Java scripts (*.js)
Scripts can be global (a global script is run for all profiles) or local (a local script is only run for one profile).
Global scripts must be located in the "GlobalScripts" folder in the ViceVersa PRO installation folder, usually 'c:\program files\ViceVersa PRO2\GlobalScripts'
They must be called global_start.ext (global_start is the global script to run when a profile starts) or global_end.ext (global_end is the global script to run when a profile ends). .ext can be one of the supported extensions, that is .vbs, .js, .bat or .cmd
If you need to define multiple start scripts, the first script must be called 'global_start.ext', the second one 'global_start_1.ext', the third one 'global_start_2.ext' and so on, up to a max of 9. Same mechanism for the global end scripts: the first must be called 'global_end.ext', the second one 'global_end_1.ext', the third one 'global_end_2.ext' and so on, up to a max of 9.
Once you have created and placed your global scripts in the GlobalScripts folder, you will need to activate the option "Run custom scripts before comparison" and/or "Run custom scripts after execution" in the profile settings for the profiles you wish to run the scripts for. If you do not activate these profile options, the profile will not run the global scripts before and/or after execution.
Local scripts are run only for a specific profile. Differently from global scripts, local scripts must be located in the same folder as the ViceVersa profile file (.fsf file) and they must be called 'profilename_start.ext' for the script to run before execution, or 'profilename_end.ext' for the script to run after exection; profilename is the name of you profile, which you want to run the local script for. .ext can be one of the supported extensions, that is .vbs, .js, .bat or .cmd
Also for running local scripts, you will need to activate one or both the options "Run custom scripts before comparison" and "Run custom scripts after execution" in the profile settings for the profiles you wish to run the local scripts for.
| S.M.A.R.T. Script: Checks Drive Health Before Running a Profile |
Self-Monitoring, Analysis, and Reporting Technology, or S.M.A.R.T., is a monitoring system for computer hard disks to detect and report on various indicators of reliability, in the hope of anticipating failures. More information.
The batch file downloadable on this page can be setup to run BEFORE a ViceVersa profile and if the S.M.A.R.T. check reports an issue with the computer hard disk's health, it will abort profile execution. This prevents files from being corrupted.
How to install:
- Download the file smart.zip
- Inside the smart.zip file, open and read the file install.txt which contains the installation instructions.
- Once installed, the output of the S.M.A.R.T. check will be included in the ViceVersa profile log (if a log file for the profile has been setup)
| Script Output |
Script output is redirected to the ViceVersa profile log (if a log file for the profile has been setup). You are able to check the script output by looking at the ViceVersa profile log.
| Script Return Codes |
If any of the scripts that run before profile execution return an exit code different from 0, the execution is canceled and the ViceVersa profile does not run.
| Script Variables |
Scripts have access to some ViceVersa variables by means of Environment Variables. ViceVersa PRO makes the following variables available.
ViceVersa PRO 2 Build 2011 (or newer):
VV_PROFILE_NAME = The name of the ViceVersa profile
VV_PROFILE_PATH = The path of the ViceVersa profile
VV_SOURCE_DISK = The disk where the source folder is (e.g. c:, d:)
VV_TARGET_DISK = The disk where the target folder is (e.g. c:, d:)
VV_EXIT_CODE = The ViceVersa exit code (only for scripts running AFTER execution)
VV_SOURCE_FOLDER = The profile source folder
VV_TARGET_FOLDER = The profile target folder
VV_INCLUDE_SUBFOLDERS_FLAGS = Subfolders inclusion flag
VV_COMPARISON_TYPE = Comparison Type (0=Size and Timestamp) (1=CRC) (2=Both)
VV_EXECUTION_METHOD = Execution Method (0= None) (1=Synchronization) (2=Backup (Mirror Source to Target)) (3=Replication (Augment Target)) (4=Replication (Refresh Target)) (5=Replication (Update Target)) (6=Consolidation)
VV_LOG_FILE = Log File
VV_SOURCE_ARCHIVE_FOLDER = Source Archive Folder VV_TARGET_ARCHIVE_FOLDER = Target Archive Folder
ViceVersa PRO 2 Build 2014 (or newer):
In addition to the above variables, ViceVersa PRO 2 Build 2014 (or newer) also supports the following variables.
VV_EXIT_CODE_DESC = The textual description of the exit code
VV_EXECUTION_METHOD_DESC = Execution Method Description
VV_RUN_SUMMARY = A summary of the files copied or deleted.
VV_FINAL_STATUS_SUMMARY = The final status summary of all the files in source and target
VV_CONFLICT_SUMMARY = A list of the conflict files found during synchronization (max. 10 are listed)
ViceVersa PRO 2 Build 2015 (or newer):
In addition to the above variables, ViceVersa PRO 2 Build 2015 (or newer) also supports the following variables.
VV_RUN_START_TIME = Run Start Time
VV_RUN_END_TIME = Run End Time
*************************************************
The following is an example of how to get the value of these Environment Variables in a VBscript:
Set WshShell = WScript.CreateObject("WScript.Shell")
WScript.Echo WshShell.Environment("PROCESS").Item("VV_SOURCE_FOLDER")
WScript.Echo WshShell.Environment("PROCESS").Item("VV_TARGET_FOLDER")
WScript.Echo WshShell.Environment("PROCESS").Item("VV_LOG_FILE")
WScript.Echo WshShell.Environment("PROCESS").Item("VV_EXIT_CODE")
In a BAT file, Environment Variables can be referred to by using %%, for example:
%VV_PROFILE_NAME%
%VV_EXIT_CODE%
| Using Global Scripts in ViceVersa PRO |
ViceVersa PRO 2 Build 2011 (or newer) supports Global Scripts.
Global Scripts run before and/or after profile execution.
Global Scripts can be Visual Basic scripts (*.vbs), Batch Files (*.bat, *.cmd) or Java Scripts (*.js).
Global Scripts must be located in the "GlobalScripts" folder under the ViceVersa PRO installation folder; usually 'c:\program files\ViceVersa PRO2\GlobalScripts'.
The script global_start.ext runs before a profile starts (.ext can be one of the supported extensions, i.e. .vbs, .bat, .cmd or .js)
The script global_end.ext runs after a profile ends (.ext can be one of the supported extensions, i.e. .vbs, .bat, .cmd or .js)
Once you have created the global script(s) in the GlobalScripts folder, you need to activate the option "Run custom scripts before comparison" and/or "Run custom scripts after execution" in the profile settings, for the profiles you want to run the scripts for.
Solutions to Known Issues |
| Can Not Copy Google Docs/Sheets from Google Drive to My Computer |
I am trying to copy gsheet and gdoc files from Google Drive to my computer using ViceVersa, but I get the error "Invalid Function". Why?
Google Drive file formats are cloud-only files. gdoc and gsheets are shortcuts to the document / sheet and can't be copied locally. If you want a traditional file that you can copy, open and edit locally, you need to use a non-native file format such as .docx .xlsx .pptx etc. You must first download or convert your files to the .docx or .xlsx format before you can copy them to your computer.
| Errors while running a large number of profiles concurrently in VVEngine |
SYMPTOMS
When running a large number of profiles concurrently in VVEngine, the following errors may appear:
-
Some of the profiles may stop with out-of-memory or "Windows heap depletion" errors.
-
Some of the profiles complete, however without copying any files (this may happen only in versions before 2.5 build 2503).
-
Other profiles complete properly.
CAUSE
This behaviour may occur if the Windows desktop heap (when VVEngine is running as a standard program) or the non-interactive heap (when VVEngine is running as a Windows Service) in the WIN32 subsystem is depleted.
Windows Heap depletion can happen because other programs / services in addition to VVEngine may be using the memory allocated in the Windows Heap.
SOLUTION
a) Limit the amount of profiles that are running concurrently by scheduling them to run at different times.
or
b) Increase the Windows desktop heap size:
Important: This section contains steps that tell you how to modify the registry. However, serious problems might occur if you modify the registry incorrectly. Therefore, make sure that you follow these steps carefully. For added protection, back up the registry before you modify it. Then, you can restore the registry if a problem occurs. For more information about how to back up and restore the registry, click the following article number to view the article in the Microsoft Knowledge Base: http://support.microsoft.com/kb/322756/
1.Run Registry Editor (Regedt32.exe).
2.From the HKEY_LOCAL_MACHINE subtree, go to the following key: \System\CurrentControlSet\Control\Session Manager\SubSystems
3.Select the Windows value.
4.From the Edit menu, choose String.
5.Increase the SharedSection parameter:
SharedSection uses the following format to specify the system and desktop heaps:
SharedSection=xxxx,yyyy,zzzz
For 32-bit operating systems, increase the yyyy value to "12288";
Increase the zzzz value to "1024".
For 64-bit operating systems, increase the yyyy value to "20480";
Increase the zzzz value to "1024".
6. Restart the computer.Note: Microsoft also provides a tool that can do the above steps automatically. The tool can be found at http://support.microsoft.com/kb/126962 or at http://support.microsoft.com/kb/947246 for Windows Vista, 7, 2008.
References:
- "Out of Memory" error message appears when you have a large number of programs running: http://support.microsoft.com/kb/126962
- You may receive an "Out of Memory" error message because of the desktop heap limitation in Windows Vista or in Windows 7: http://support.microsoft.com/kb/947246
- Increasing the Desktop Application Heap: http://ss64.com/nt/syntax-desktopheap.html
- Desktop Heap Overview: http://blogs.msdn.com/b/ntdebugging/archive/2007/01/04/desktop-heap-overview.aspx
- Desktop Heap Overview - Part 2: http://blogs.msdn.com/b/ntdebugging/archive/2007/07/05/desktop-heap-part-2.aspx
- Sessions, Desktops and Windows Stations: http://blogs.technet.com/b/askperf/archive/2007/07/24/sessions-desktops-and-windows-stations.aspx
- Services, Desktops, and Window Stations: http://support.microsoft.com/kb/171890
| Fix VVScheduler Error: "A Specified Logon Session Does not Exist" |
To solve this error in VVScheduler please see:
https://blogs.technet.microsoft.com/askperf/2012/04/18/task-scheduler-error-a-specified-logon-session-does-not-exist/
| I Get 'Exit Code 2, the system cannot find the path specified' when Running ViceVersa from VVScheduler. Why? |
This error does not happen when you run ViceVersa manually by clicking on "Compare".
This can occur if you are working with a mapped network drive. Drive mappings may not be available when a scheduled task runs even if you set up the task to log in with your user name and password.
Solution:
- Set up the folders as UNC paths rather than mapped drive letters, e.g. \\server\share\, or remap the network drive in the ViceVersa PRO profile settings (profile settings -> folders -> network).
| Mapped Drives Might Not Be Available or Not Found when ViceVersa Is Run with 'Elevated Privileges' |
Running a program with "Elevated Privileges" is when a program is run by a user that is granted the ability to do more than just a standard user. A standard user is someone that has no administrative privileges in any capacity. By default, ViceVersa runs under standard user rights, without any administrative privileges.
However, ViceVersa can also be run with Elevated Privileges if running from the VVEngine, the VVScheduler or by right-clicking on the ViceVersa icon and then selecting Run as Administrator.
When running with Elevated Privileges, there could be an issue accessing mapped drives, if they were mapped under a standard user. This is a general Windows issue, not specific to ViceVersa. More information can be found on the Microsoft website:
Possible Solutions:
a) Map the drive again in the ViceVersa profile settings, so that the drive is remapped by ViceVersa each time the profile runs. Read More.
b) Enable the EnableLinkedConnections option in the Windows Registry:
- Click Start, type regedit in the Start programs and files box, and then press ENTER.
- Locate and then right-click the registry subkey HKEY_LOCAL_MACHINE\SOFTWARE\Microsoft\Windows
\CurrentVersion\Policies\System. - Point to New, and then click DWORD Value.
- Type EnableLinkedConnections, and then press ENTER.
- Right-click EnableLinkedConnections, and then click Modify.
- In the Value data box, type 1, and then click OK.
- Exit Registry Editor, and then restart the computer.
| Mapped Network Drives Do Not Work in Scheduled Tasks |
Mapped network drives do not work in scheduled tasks, unless you explicitly map them before running the task (see note 1 below). Regardless, they may still fail for a number of reasons.
If you plan to schedule a ViceVersa profile to run in VVScheduler, VVLauncher or VVEngine (or on the command line), make sure you use the UNC network path directly in the ViceVersa profile, instead of the mapped drive.
For instance, instead of the mapped drive Y:\ use the UNC path \\ComputerName\Share\
If you need to provide a user / password combination to access \\ComputerName\Share\ , you can enter that information in the ViceVersa profile: profile settings -> folders -> network.
----------------
Note 1: It is possible to re-map a network drive in ViceVersa -> profile settings -> folders -> network. This requires ViceVersa version 3 or newer.
----------------
Note 2: If you are running VVEngine as a Windows Service, under the LocalSystem account, then the service won't have access to the network at all and using UNC paths will also fail. In this case, set the service to run under the NetworkService account or another account with access to the network. For more information on service accounts see: http://msdn.microsoft.com/en-us/library/ms686005(VS.85).aspx
| Profile getting stuck on 'Comparing Done.' |
When comparing very large file data sets (many terabytes), ViceVersa PRO could get stuck on 'Comparing Done'. This issue has been fixed in ViceVersa PRO 2.5 build 2517, released in May 2016 (or newer).
| Slow File Deletion in Windows Vista |
If you experience slow file deletion by ViceVersa when running on Windows Vista, it is most likely caused by sending files to the Recycle Bin.
The solution is to disable the option to send files to the Recycle Bin when deleting. The option is accessed from the ViceVersa main menu -> view -> preferences.
| Why Outlook OST files do not copy on Windows Vista, when using VSS Volume Shadow Copies? |
When using VSS Volume Shadow Copies in Vista, ViceVersa PRO gives this error message if you try to copy an Outlook OST file:
"Can not open outlook.ost. The file could not be located."
This is by design in Windows Vista. Windows Vista Volume Shadow Copies do not include Outlook OST files.
The following is Microsoft explanation of this design decision:
<< Maintaining changes to .ost files within shadow copies is expensive in terms of space and I/O activity. The performance impact doesnt occur during the image backup itself--the only extra work at backup time is backing up the .ost file as part of the image. Instead, the performance impact occurs during the ongoing, everyday I/O to the .ost file when Outlook is running. If the .ost changes were kept in shadow copies, then every time Outlook writes to the .ost file, the result is a copy-on-write I/O hit (2 writes, 1 read). Although we have worked to reduce the impact of copy-on-writes on shadow copies, a heavily churned file like an .ost file could still cause problems. For these reasons, and the fact that .ost files can be regenerated, we chose to delete .ost files from the shadow copy before the image is created.
Even if the performance issues didnt exist, there are situations where Exchange will, after an .ost is restored, detect a future version of the .ost file and force you to delete and then regenerate the local .ost file. Therefore, its still preferable to regenerate an .ost file instead of restoring it. >>
Hence, OST files cannot be copied with ViceVersa PRO using VSS Volume Shadow Copies, on Windows Vista.
To prevent ViceVersa PRO from reporting this error with OST files and VSS, exclude the OST file from the profile. Add an exclude file filter to exclude the file "outlook.ost", under profile settings -> file filters.
| [Error Message] 'Can not copy NTFS Additional File Streams ... The request is not supported.' |
SYMPTOMS
- You are running ViceVersa PRO on a computer that is running Windows Vista or Windows Server 2008
and
- You are copying a file over the network from a computer that is NOT running Windows Vista or Windows Server 2008
and
- You get the error message: "Can not copy NTFS Additional File Streams ... The request is not supported." The message is shown for some files only.
This error message is caused by a problem in Windows Vista and Windows Server 2008, as confirmed by Microsoft.
SOLUTION- Download and install the Windows hotfix from the Microsoft website: http://support.microsoft.com/kb/973278
or
- Disable copying NTFS additional file streams in ViceVersa. The option is in the ViceVersa profile settings -> advanced settings -> details. More info re additional file streams: http://en.wikipedia.org/wiki/Fork_(filesystem)
| [Error Message] 'File / Folder Path Longer Than 259 characters.' |
ViceVersa PRO shows an error message when trying to copy files or folders with path longer than 259 characters. The files or folders are skipped.
You can enable support for paths longer than 259 characters in ViceVersa as shown in this article: http://www.tgrmn.com/web/kb/item31.htm
| [Error Message] The Network BIOS Command Limit Has Been Reached |
VVEngine shows the error message "The network BIOS command limit has been reached" in Windows Server 2003, in Windows XP, and in Windows 2000 Server.
This error message is shown when the maximum number of simultaneous, active requests between an SMB client and the server has been reached. To increase the maximum number, follow the instructions on this Microsoft Knowledge Base article: http://support.microsoft.com/kb/810886
| [VVLauncher] Installing VVLauncher as a Service, I Get the Error that VVLauncher Cannot Access a Network Drive. Why? |
By default the VVLauncher service is installed under the LocalSystem account. The LocalSystem account does NOT have access to network drives. To access the network you need to run the VVLauncher service under a user account which has access to the network drive.
-
Open the Control Panel
-
Select Administrative Tools -> Services
-
Locate the service named VVLauncher
-
Double click on it or click the button "Properties"
-
Select the tab "Log In As" (this can have an other caption depending on the Windows version)
-
Enter the user account and password.
-
Click OK.
-
Restart the VVLauncher service.
Note: Do not use mapped drives to access the network. Instead use UNC paths ( eg \\server\share\ ). Services do not recognize mapped drives.
| [VVLauncher] Why Do I Get a 'Cannot Monitor Folder' Error When Running VVLauncher as a Service? |
You are probably running the VVLauncher service under the "Local System" account. The "Local System" account does not have access to network resources. This is causing the error.
To solve this, run the service under a user account which has access to the network share (you will need to specify proper user name and password).
| [VVScheduler] Windows 10 Anniversary Update issues (version 1607) |
The Windows 10 Anniversary Update (version 1607) was made available on 2nd August 2016 to the general public. Three problems were found in this Windows 10 update that might impact the VVScheduler:
1) Scheduled tasks in the VVScheduler may show incorrect Next Run Time, Last Run Time, Last Run Result and/or Status.
2) If the option 'Run only if logged' is NOT set in the scheduling properties, then the scheduled task fails to run.
3) Tasks that are set to repeat every X minutes in VVScheduler may fail to run.
Please note that the VVEngine and VVLauncher are NOT affected by these issues. These issues only apply to VVScheduler on Windows 10 Anniversary Update (version 1607).
UPDATE:
To solve issue 1, download the latest ViceVersa PRO 2.5 Build 2519 or newer from our website: http://www.tgrmn.com/web/download.htm
To solve issues 2 and 3, update Windows 10 to Windows 10 Creators Update (version 1703 or newer) and download and install the latest ViceVersa PRO 2.5 Build 2519 or newer.
How to Check the Windows 10 Build Version:
- Open the run command using WinKey + R
- Launch WinVer : type winver and hit OK
| [VVScheduler] Windows Server 2016 issues |
When the new operative system Windows Server 2016 was initially released, VVScheduler had the following issues:
1) Scheduled tasks may have shown incorrect Next Run Time, Last Run Time, Last Run Result and/or Status.
2) If the option 'Run only if logged' was NOT set in the scheduling properties, then the scheduled tasks failed to run.
3) Tasks that were set to repeat every X minutes in VVScheduler may have failed to run.
Tools and Add-ons |
| Folder Snapshot Extension |
 Download Folder Snapshot Extension for ViceVersa PRO 3, 4, 5, 6
Download Folder Snapshot Extension for ViceVersa PRO 2.5
The ViceVersa Folder Snapshot Extension adds some useful snapshot commands to the Windows Explorer folder context menu. Download the installer above to install the extension. To remove the extension simply uninstall.
After installation of the extension, right-clicking on a folder in Windows Explorer will show the following two extra commands in the menu:
- Create Snapshot: This command creates a snapshot file "snapshot.vsn" in the selected folder. The snapshot will contain information about all files and subfolders in the selected folder, including their timestamps.
- Compare vs Snapshot: This command compares the content of the selected folder (and subfolders) vs. an existing snapshot file "snapshot.vsn" in that folder. ViceVersa PRO will start and show the differences between snapshot and current folder contents.
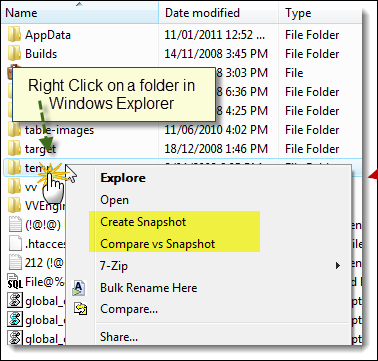
Right-clicking on a folder in Windows Explorer
shows two extra snapshot commands
Additionally, in Windows 11, 10, 8, 7, Vista, 2008 or newer, right-clicking + shift on a folder in Windows Explorer (press shift and hold, while right clicking) will show the following extra commands in the menu:
- Create CRC Snapshot: This command creates a snapshot file "snapshot.vsn" in the selected folder, including the CRC values for all the files.
- Compare vs CRC Snapshot: This command compares the content of the selected folder (and subfolders) vs. an existing snapshot file "snapshot.vsn" in that folder. ViceVersa PRO will start and show the differences between snapshot and current folder contents, including CRC values.
- Create Snapshot (Run as Administrator): This command creates a snapshot file "snapshot.vsn" in the selected folder, running elevated as administrator.
- Create CRC Snapshot (Run as Administrator): This command creates a CRC snapshot file "snapshot.vsn" in the selected folder, running elevated as administrator.

In Windows 11, 10, 8, 7, Vista, 2008 or newer, right-clicking + shift
on a folder in Windows Explorer shows additional snapshot commands
| VVEngine |
VVEngine is an advanced scheduler for all your ViceVersa profiles. It is a separate download. More info can be found here
| VVEngine Gadget |
The VVEngine Gadget puts your ViceVersa profiles right on your desktop! It's free when you purchase VVEngine. More info and a video demo are available here
| VVLogViewer |
VVLogViewer is a tool that makes viewing the ViceVersa log files easy. VVLogViewer can highlight errors and warnings in the log and can quickly jump to lines containing errors, simply by pushing F4.
VVLogViewer is free and it is included in the main ViceVersa PRO download.
| VVScheduler and VVLauncher |
VVScheduler and VVLauncher are two schedulers for ViceVersa PRO profiles. They are free and included in the main ViceVersa PRO download. More info here
VVEngine |
| 01. What is VVEngine? |
VVEngine is a new add-on for ViceVersa PRO.
VVEngine is an advanced scheduler that lets you schedule all your ViceVersa profiles.
VVEngine lets you create profile chains and categories to run sequentially.
With VVEngine you can:
- Setup multiple profiles and profile groups
- Run profiles every X minutes, every X hours, every X days
- Exclude specific days / hours from the schedule
- Setup profiles to run as soon as file changes are detected
- Setup profiles to run when USB drives are detected
- Setup profiles to run when network connections are detected
- Do not start profiles if computer is using battery power (and/or battery level is low)
- Start profiles only if the computer IP address matches a specified value
- Start profiles only if all source and target folders in the profile are accessible
- Report an error if a profile has not run for more than X minutes
- Automatically re-run profiles if an error occurs
- Run one ViceVersa profile after another (sequentially)
- View profile history and results for the last 15 runs
- Control VVEngine with a browser, also from a different computer or remotely over the Internet
- Control VVEngine from VVConsole, a dedicated command line / scripting program
- Setup VVEngine to run as a service
- Report errors in the Windows Event Log
- New VVEngine Gadget for Windows 7 and Vista: put your profiles right on the desktop! Learn More
Download VVEngine from the VVEngine Home Page
See the extra features VVEngine offers VV PRO users in the Scheduling Comparison Chart
| 02. What Are the Requirements to Run VVEngine? |
To run VVEngine you need ViceVersa PRO 2 or newer installed (VVEngine is a ViceVersa PRO add-on).
VVEngine runs on Windows 11, 10, Windows 8, Windows 7, Windows Vista, Windows XP, Windows 2000, Windows Server 2003, Windows Server 2008 (all editions of these operative systems, including R2), Windows Server 2012 (all editions, including R2), Windows Server 2016 (all editions), Windows Server 2019 (all editions), Windows Server 2022 (all editions), Windows Server 2025 (all editions), Windows Home Server and Windows Small Business Server. VVEngine does not run on Windows 98, Me or 95. VVEngine is a 32-bit application, compatible with both Windows 32-bit and 64-bit.
To control VVEngine you need an Internet browser: Microsoft Internet Explorer 5.5 (or later), FireFox 1.5 (or later), Chrome, Opera or Edge.
| 03. Which Browsers are Supported by VVEngine? |
All modern browsers are supported, such as FireFox, Chrome or Edge.
Internet Explorer 5.5 (or later) is also supported.
VVEngine requires Javascript to be enabled. Usually Javascript is enabled by default.
| 04. How Do I Install VVEngine? |
- VVEngine requires ViceVersa PRO 2 or newer to run. If you do not already have ViceVersa PRO installed, you can download ViceVersa PRO here
- After installing ViceVersa PRO, download the VVEngine installer from http://www.tgrmn.com/web/vvengine/vvengine.htm
- If you have a previous version of VVEngine already installed see Upgrade VVEngine
- Start the installation process by running the downloaded file
- At the end of installation, VVEngine will start.
You connect to VVEngine with your Internet Browser. Start the browser (e.g. Internet Explorer or FireFox) and type http://127.0.0.1:8001 in the address bar. This unique address opens the VVEngine interface.
When you open VVEngine for the first time there will be no ViceVersa profiles scheduled. You can add a new profile by clicking on "Add Profile" on the main VVEngine page.
Notes:
- After installation, VVEngine will automatically run in the background each time you start Windows.
- VVEngine is installed for the current user. If you wish to install VVEngine as a service see the related article http://www.tgrmn.com/web/kb/item48.htm
| 05. Does VVEngine Start Automatically Every Time I Start Windows? |
Yes. Once VVEngine is installed, it will automatically start when you start Windows.
If you uninstall VVEngine, VVEngine will be removed and will no longer start when you start Windows.
| 06. What Ports and Protocols Does VVEngine Use? |
By default, VVEngine uses port 8001 and the HTTP protocol to communicate with your web browser. To connect to VVEngine, type http://127.0.0.1:8001 into your web browser address bar.
N.B.: By default, VVEngine only allows connections from the local computer (127.0.0.1). To allow connections from other computers, see: http://www.tgrmn.com/web/kb/item54.htm
| 07. Can I Connect to VVEngine from a Remote Computer? |
*** Requires VVEngine 1.1 or any later version ***
Yes, you can connect to VVEngine from a remote computer. You will need to change the default VVEngine settings in order to do this, because, by default, VVEngine only allows web browser connections from the local computer (IP 127.0.0.1).
- Select "Start" > "All Programs" > "VVEngine for ViceVersa PRO" > "VVEngine Settings".
- In the VVEngine Settings dialog box, enter the IPs that will be allowed to connect to VVEngine in the "Allowed IPs" field.
- Click on "Apply Changes". VVEngine will restart with the new settings.
- Click on "Close".
After this change, to connect from a remote computer, type http://<ip>:<port> into the web browser address bar on the remote computer.
<ip> is the IP of the computer where VVEngine is running.
<port> is the VVEngine HTTP port, usually 8001.
For example http://192.168.1.100:8001
Some 'Allowed IPs' examples
To allow only the local computer to connect to VVEngine (default):
Allowed IPs = 127.0.0.1
To allow the local computer to connect to VVEngine and the IP 192.168.1.1:
Allowed IPs = 127.0.0.1|192.168.1.1
To allow the local computer to connect to VVEngine and all IPs starting with 192.168:
Allowed IPs = 127.0.0.1|192.168.*
To allow the local computer to connect to VVEngine, all IPs starting with 192.168 and IP 10.10.10.10:
Allowed IPs = 127.0.0.1|192.168.*|10.10.10.10
To allow all IPs to connect to VVEngine:
Allowed IPs = *
| 08. Can I Use VVEngine to Run Profiles Manually? |
Yes, you can add profiles to VVEngine without them being part of a schedule and run them manually. You do this by clicking on 'Run Profile'.
Profiles without a schedule have the text 'Manually' written in the 'Next Run' field.
This allows you to organize your profiles into categories and see the profile history for the last 15 runs.
| 09: How Do I Use VVEngine to Run a ViceVersa Profile As Soon As a USB Drive Is Inserted? |
- Start VVEngine. Click on 'Add Profile'
- Select the ViceVersa profile you want to run when the USB drive is inserted
- Activate the option 'Run Immediately As Soon As Source and Target are Accessible'
- Click 'OK'
Your profile has now been added to the VVEngine list. As soon as all the sources and targets in the profile are accessible VVEngine starts the profile to synchronize, replicate or backup your files.
| 10. How Do I Use VVEngine to Run a ViceVersa Profile As Soon As the Network Is Accessible? |
- Start VVEngine. Click 'Add Profile'
- Select the ViceVersa profile you want to run when the network is accessible
- Activate the option 'Run Immediately As Soon As Source and Target are Accessible'
- Click 'OK'
Your profile is added to the VVEngine list. As soon as all the sources and targets in the profile are accessible, VVEngine starts the profile to synchronize, replicate or backup your files.
Note: network detection can take a couple of minutes.
If you want to start the profile only once an hour, once a day or once a week (i.e. you disconnect and reconnect to the network multiple times but only want the profile to start every hour, day or week) select 'Hourly', 'Daily' or 'Weekly' instead of 'Immediately'.
| 11. How Do I Run One Profile After Another? |
With VVEngine you can run multiple ViceVersa profiles sequentially.
You can do this in 2 ways:
Manual Runs: Add the ViceVersa profiles to VVEngine with no scheduling options set and make all of them part of the same category. When you want to run all the profiles in the category, select the category and click on "Run All" in VVEngine. "Run All" runs all the profiles in the current category.
Scheduled: Add the ViceVersa profiles to VVEngine. For the first profile, change the schedule and set the "After this profile, run ..." to the profile name of the second profile. Then open the second profile's schedule and set the "After this profile, run ..." to the profile name of the third profile and so on. Note that only the first profile needs to have a schedule set, because the second, third, etc. will run sequentially after the first one.
| 12: What Are the Advantages of Running VVEngine as a Windows Service? |
Running VVEngine on a Windows Server as a Windows Service allows you to keep VVEngine running even when no one is logged onto the server. It also allows you to run VVEngine under a different account from the current logged-in account.
When VVEngine is installed as a Windows Service, you are still able to control it with a web browser and from a remote machine.
See How Do I Install VVEngine as a Windows Service? and Control VVEngine From a Remote Computer
| 13. How Do I Setup VVEngine as a Windows Service? |
*** Requires VVEngine 1.1 or any later version ***
- After installing VVEngine (see http://www.tgrmn.com/web/kb/item47.htm) go to the installation folder (usually c:\program files\vvengine\)
- Open the subfolder "Serv".
- Double-click on the file "Service - INSTALL VVEngine as Service.bat" This script will install VVEngine as a service. You will need administrator privileges to be able to do it. Note: this script will stop any VVEngine profiles that are running before installing VVEngine as a service.
- Open the Windows Service Console. You should now see VVEngine in the list of installed services.
- Right-click on the "VVEngine service" and select "Properties" from the menu. Click on the "Log On" tab and select which account will run the VVEngine service. If you plan to schedule synchronizations or replications over the network, an account with network access needs to run the VVEngine service, e.g. Administrator
- After having selected the right account, click on the button "OK" and start the service by right-clicking on the service name and selecting "Start" from the menu.
- As a service, VVEngine will keep running even if no one is logged onto the computer.
- You can connect to VVEngine from any computer in the network by typing http://<ip>:8001 into the web browser address bar. <ip> is the IP address of the computer on which VVEngine is running (for example http://192.168.1.100:8001). See http://www.tgrmn.com/web/kb/item54.htm for more information.
Please Note:
VVEngine saves its settings and the profile list in a file called VVEngine.xml This file is kept in the folder c:\Documents and Settings\<account>\Application Data\VVEngine (where <account> is the account name running VVEngine).
If you install VVEngine as a service under a different account and you want to maintain the profile list, you will need to copy this file from the old account location to the new account location.
Additional Information:
- Services do not have access to mapped network drives: use UNC paths in the ViceVersa profile settings if you plan to run VVEngine as a Windows Service and need to access the network.
- The local system account does not have access to the network at all. Use the NetworkService account or a user account with network access if you need to access the network.
- If a password to access the network is needed, enter it in profile settings -> folders -> network in the ViceVersa profile.
- If the password to access the network expires or changes, it needs to be re-entered.
- If the account password for the account running the VVEngine service is changed or expires the VVEngine service will stop working. An event is logged in the Windows Event Log. You'll need to re-enter the password in the service properties. Best practice is to use a dedicated account to run the VVEngine service with a password that does not expire.
- To use Volume Shadow Copies, backup / restore privileges are required (use an account member of the Backup Operators group or Administrators to run the VVEngine service).
| 14. How Do I Uninstall VVEngine? |
You can remove VVEngine like any other Windows program. The uninstall procedure will completely and cleanly remove VVEngine from your computer.
Follow these steps:
Windows 11, Windows 10, Windows 8, Windows 7, Windows Vista, Windows Server 2025 / 2022 / 2019 / 2016 / 2012 / 2008
- Go to the Start menu > Control Panel. (Learn how to access the Control Panel)
- Click Programs and Features.
- Double-click VVEngine.
- Click Yes when asked to confirm that you want to uninstall VVEngine.
- The uninstall procedure will completely and cleanly remove VVEngine from your system.
Windows XP, Windows Server 2003, Windows Server 2000
- Go to the Start menu > Control Panel.
- Click Add or Remove Programs.
- Double-click VVEngine.
- Click Yes when asked to confirm that you want to uninstall VVEngine.
- The uninstall procedure will completely and cleanly remove VVEngine from your system.
| 15. How Do I Run a Profile Once a Week, on Monday at 2 PM? |
To schedule a profile to run at a specific time, for example once a week, on Monday at 2 PM, set the profile schedule as follows:
- Run Every Day
- Start Time 2:00 PM
- Don Not Run on: Tue, Wed, Thu, Fri, Sat, Sun (exclude each day but Monday)
This schedule will run the profile every Monday at 2 PM.
| 16. How Does VVEngine Compare with the Other Scheduling Tools Available for ViceVersa PRO? |
See the extra features VVEngine offers in the Scheduling Comparison Chart
| 17. VVEngine and Firewalls |
By default VVEngine uses the HTTP protocol on port 8001 to communicate with your browser. If you are unable to access VVEngine on http://127.0.0.1:8001 with your browser, make sure your firewall is not blocking VVEngine. See also http://www.tgrmn.com/web/kb/item50.htm
| 18. Can I Restrict Access to VVEngine with a Password? |
*** Requires VVEngine 1.1 or any later version ***
Yes, you can restrict access to VVEngine with a password. To setup a password, follow the steps below:
- From the Windows Taskbar, select "Start" > "All Programs" > "VVEngine for ViceVersa PRO" > "VVEngine Settings".
- In the VVEngine settings dialog box, enter the access password in the "HTTP Password" field.
- Click on "Apply Changes". VVEngine will ask you to confirm the password you entered and then restart.
- Click on "Close".
VVEngine will now require a password when connecting with a web browser.
| 19. Can I Change the HTTP Port Used by VVEngine? |
*** Requires VVEngine 1.1 or any later version ***
Yes, you can change the HTTP port used by VVEngine.
The default port is 8001. This can be changed if conflicts occur with other applications.
- From the Windows menu, select "Start" > "All Programs" > "VVEngine for ViceVersa PRO" > "VVEngine Settings".
- In the VVEngine settings dialog box, enter the new port in the "HTTP Port" field.
- Click on "Apply Changes". VVEngine will restart.
- Click on "Close".
| 20. RSS Feeds |
*** Requires VVEngine 1.1 or any later version ***
VVEngine supports two RSS feeds (three since version 2.0) that can report the latest run for each enabled profile in VVEngine. The VVEngine feeds are accessible via any RSS reader. The feeds are accessible at:
http://<ip>:<port>/rss.xml (eg http://127.0.0.1:8001/rss.xml or from a remote computer http://192.168.1.1:8001/rss.xml)
and
http://<ip>:<port>/errors.xml (eg http://127.0.0.1:8001/errors.xml or from a remote computer http://192.168.1.1:8001/errors.xml, this feed only reports profiles with errors)
and
http://<ip>:<port>/rssall.xml (eg http://127.0.0.1:8001/rssall.xml or from a remote computer http://192.168.1.1:8001/rssall.xml, this feed reports all profiles, including disabled profiles. This feed is only available in VVEngine version 2.0 or newer)
VVEngine RSS Examples
Google Desktop Gadget OneFeed showing VVEngine RSS feed
Windows Vista Sidebar Gadget showing VVEngine RSS feed
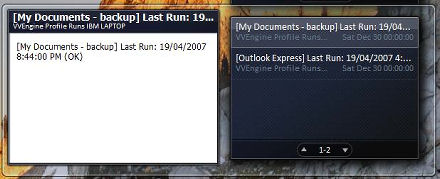
| 21. The ViceVersa Profile Path changes to 'c:\fakepath\...' in VVEngine when using Internet Explorer 8 |
This issue is caused by a new security feature added to Internet Explorer 8. Updating to VVEngine 1.1 Build 07 (or newer) fixes this problem.
| 22. About the VVEngine Desktop Gadget |
*** Requires VVEngine 2.0 or any later version ***
Keep an eye on VVEngine! The VVEngine Gadget puts VVEngine right on your desktop.
You can keep track of what's happening in VVEngine while you work. You can run and check profiles right from your desktop. You can position the gadget anywhere on the screen, move it and resize it as you like.
The VVEngine Gadget is available for Windows 7, Vista or newer. It requires VVEngine 2.0 or newer to be installed.
| 24. Real-Time Backup / Replication / Synchronization with VVEngine and ViceVersa |
NEW: Real-Time, Super-Fast, No Rescanning Execution. Monitor source and/or target folders for changes at file or subfolder level, and then backup, synchronize, replicate files without folder rescanning. Essential over slow connections and for real-time execution with a large amount of files. Plus VVEngine keeps track of all the changes happening so they can be reviewed.
*** Requires VVEngine 2.1 or newer, Server Premium Edition or Client Edition ***
How to setup Real-Time execution in VVEngine.pdf
Overview of the New VVEngine Real-Time Functionality
In the standard backup / replication / synchronization routine, Source and Target folders are analyzed to look for file changes. The folders are scanned, their content is compared file-by-file and a list of file changes is built based on timestamps and/or size. Then the new files, or the files that have changed, are copied or deleted, as needed.
This process works well, but it is suboptimal in some circumstances where repetitive rescanning of source and target folders takes a long time. For example:
-
Over slow network connections.
-
Handling a large amount of files.
-
If backup, replication or synchronization must be real-time or as fast as possible.
For improving performance in the above situations, VVEngine 2.1 now offers some new capabilities which are described below.
The first time the profile runs, source and target folders are fully scanned and analyzed. However, after the first run VVEngine no longer scans source and target. Instead, it monitors source and target and keeps track of all file changes. Then, when the profile runs, VVEngine and ViceVersa use this information to apply the changes without the need to re-analyze the entire file set. This means that the total amount of files to backup, replicate or synchronize is no longer a factor, as changes are detected in real-time. Plus all of this happens without using extra computer resources: the file monitoring relies entirely on the standard Windows functionality and does not need any new file system driver or special service to be installed.
This new real-time capability is implemented as a new option in the VVEngine scheduling settings. The option is called "Monitoring Level". Monitoring level can be set to one of the following values:
Full Rescan: When a file change is detected, a profile run is initiated. The source and target folders are fully rescanned to find out which files have changed since the last run. This is the standard change detection functionality: source and target are fully rescanned on change detection.
Subfolder Level: Changes are detected and tracked at subfolder level. When a file change is detected, a profile run is initiated. However only the sub-folders where the file changes have occurred are rescanned which significantly improves performance. This is part of the new real-time capability of VVEngine.
File Level: Changes are detected and tracked at file level. When a file change is detected, a profile run is initiated. However only the files with changes are rescanned. This speeds up the profile execution significantly. This is part of the new real-time capability of VVEngine.
The new Subfolder Level and File Level monitoring do not require full rescanning of source or target like Full Rescan. This speeds up execution substantially especially over slow connections or when dealing with a large amount of files.
The difference between Subfolder Level and File Level is that File Level monitoring is more detailed, detecting changes at file level instead of just at subfolder level. However, because of the level of detail, it may result in more Overflow situations. Overflow situations force a full rescan if some changes are missed. For most applications, Subfolder Level monitoring will suffice.
Note: Subfolder Level and File Level detection options are only available in the VVEngine Server Premium edition or in VVEngine for Windows 11, 10, 8, 7, Vista, XP, 2000. They are not available in the VVEngine Server edition.
The following PDF document contains detailed instructions on how to setup Real-Time backup for Continuous Data Protection, replication or synchronization in VVEngine: How to setup Real-Time execution in VVEngine.pdf
| 25. How to Monitor All ViceVersa and VVEngine Profiles Running on Multiple Servers from a Single Central Server |
An easy way to monitor all ViceVersa and VVEngine profiles that are running on multiple servers from a single central server, is to use the Windows Server Manager.
Just add all the servers that need monitoring to the Server Manager on the main server and once that is done all VVEngine profiles running locally or remotely can be monitored from there.
How?
VVEngine logs all profile failure events in the Windows Application Log. These events can be shown in the Server Manager, collected from multiple servers. If an error with a profile that is running on a remote VVEngine is detected, it is then possible for the server admin to connect to that specific VVEngine to see all the details with a Web Browser, using IP address plus the VVEngine port.
Also if VVEngine is setup to run as a service, then any service failure with starting/stopping can be monitored locally and remotely via the Server Manager.
There are also other ways to report failures. For instance, an e-mail can be sent by each profile in case of profile failure to a specific e-mail address. E-Mail notifications are set in the profile settings.
| 26. VVEngine with Microsoft Edge based on Chromium |
The new Microsoft Edge is based on Chromium and was released on January 15, 2020. It is compatible with all supported versions of Windows. Downloading the browser will replace the legacy version of Microsoft Edge on Windows 10 PCs.
VVEngine is fully compatible with the new Microsoft Edge based on Chromium.
| 27. Monitoring Multiple VVEngine Installations via the REST API and JSON |
Starting with version 2.2, Build 2230, VVEngine now supports querying the status of its scheduled profiles via a REST API. The returned information is formatted as JSON objects.
The status of the profiles can be queried at URLs /profiles/ and/or /profiles/status/.
This is useful for remote monitoring of multiple VVEngine installations running on the network, using server monitoring software and/or network sensors.
It is recommended that you use the new VVEngine REST API and its JSON returned objects to monitor multiple VVEngine remotely.
Here is an example of a query via HTTP:
http://10.10.0.1:8001/profiles/
returning JSON:
{
"profiles":[
{
"_list":"http:\/\/10.10.0.1:8001\/profiles\/",
"_self":"http:\/\/10.10.0.1:8001\/profiles\/copyattr.fsf\/",
"category":"Unfiled",
"current_time":"Wed, 29 Jul 2020 07:39:44 GMT",
"description":"",
"last_exit_code":13,
"last_run":"Error - 7\/27\/2020 2:55:27 PM until 2:55:30 PM (3 sec) - (Manual Run) - Source folder not found.",
"last_successsful_run":"None",
"name":"copyattrtest.fsf",
"next_run":"None",
"path":"C:\\ViceVersa PRO\\copyattr.fsf",
"schedule":"Run manually",
"status":"Disabled",
"status_details":"",
"status_has_any_errors":false,
"status_has_any_errors_or_disabled":true,
"status_is_active":false,
"status_is_disabled":true,
"status_is_error":false,
"status_is_exec_error":false,
"status_is_not_avail":false,
"status_is_pending":false,
"status_is_running":false,
"url":"http:\/\/ 10.10.0.1:8001\/profile.htm?SHOWPROFILE=C%3a%5c%5c%5ccopyattr%2efsf",
"url_summary_status_json":"http:\/\/ 10.10.0.1:8001\/profiles\/status\/"
}
]
}
or
http://198.152.1.10:8001/profiles/status/have_any_errors_or_disabled/
returning:
{"have_any_errors_or_disabled":0}
If this exact string is not returned {"have_any_errors_or_disabled":0} then VVEngine is down or there are some profiles that have errors or are disabled.
Full description of the VVEngine REST API is available in the VVEngine manual.
To allow access to the VVEngine REST API from a remote computer, make sure you allow remote connections to VVEngine in the VVEngine settings, and also make sure that HTTP traffic on the port where VVEngine is running is allowed through the network firewall. Can I Connect to VVEngine from a Remote Computer?
| 28. Profile Filters and Real-Time Change Detection |
Starting with version 2.2, build 2230, VVEngine now considers the file and subfolder filters present in the profile settings also during real-time change detection.
If a change happens to an excluded file or in an excluded subfolder, it is then excluded from change detection too, which means that a change to an excluded file or in an excluded subfolder does not trigger a superfluous extra profile run anymore.
Note that not ALL file/subfolder filters will be taken into consideration.
Only absolute filters (filters with a drive or network full path, such as exclude c:\folder\*, for example) and file mask filters (include *.txt or exclude [1-9], for example) will be taken into consideration. Relative filters (such as \folder\) will not be taken into consideration.
When a filter is not taken into consideration, the change will be detected to a file or in a subfolder even if it is excluded in the profile settings and ViceVersa will run and will then exclude that file/subfolder anyway during execution: this might result in an unnecessary extra run. Before VVEngine version 2.2 (build 2230) all filters were ignored during change detection and the profile would always run.
More information is available in the VVEngine manual.
VVEngine Gadget |
| Download VVEngine Gadget |
The VVEngine Gadget puts VVEngine right on your desktop!

System Requirements: Windows 7 or Windows Vista with VVEngine 2.0 or newer.
How to Install: Download the gadget and open the file. If you save the file first, go to the location where the file is saved and double-click on the file to install.
How to Setup: Once installed, the gadget will self-configure and get profile information from VVEngine. Optionally, gadget options can be set.
Description: Keep an eye on VVEngine! Keep track of your profiles while you work. Run and check a profile right from your desktop. Position the gadget anywhere on the screen, move it and resize it as you like.
Watch the Video:

Screenshots:
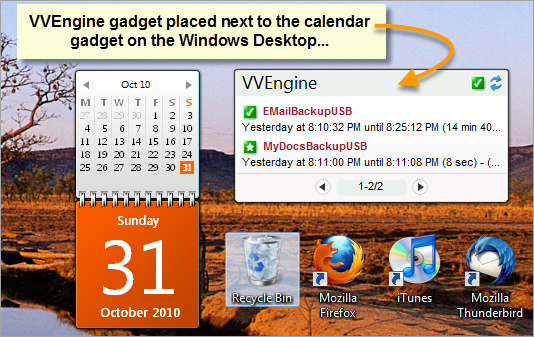
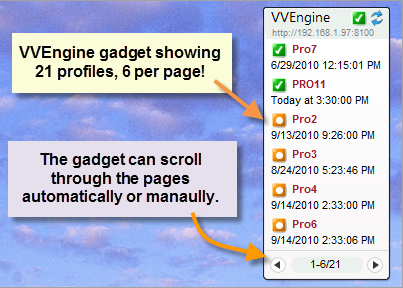
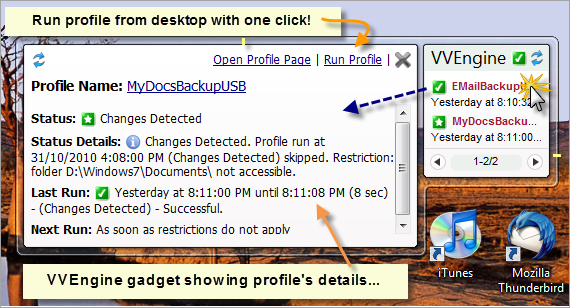
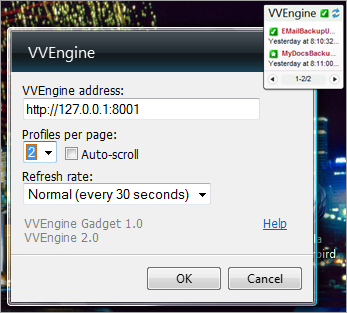
| VVEngine Gadget Message: "VVEngine not found or access is denied" |
If the VVEngine Gadget is showing the message "VVEngine not found or access is denied", the cause could be one of the following:
- VVEngine is not running. The VVEngine icon on the taskbar is gray or not present.
Solution: Start VVEngine: Start -> All Programs -> VVEngine for ViceVersa PRO -> VVEngine Home.
To show the VVEngine icon on the taskbar select: Start -> All Programs -> VVEngine for ViceVersa PRO -> Show Icon on Taskbar.
- VVEngine is running, but on a different address.
Solution: Open the VVEngine Home: Start -> All Programs -> VVEngine for ViceVersa PRO -> VVEngine Home. Check the VVEngine address in the browser address bar, then copy the address into the gadget options.
- VVEngine is running, but on a different computer.
Solution: Enter the remote VVEngine address in the gadget options. Make sure the firewall allows the HTTP protocol over the HTTP port used by VVEngine on the remote computer. The port is shown in the VVEngine address, in the browser address bar and in the VVEngine log. Make also sure that the remote VVEngine allows connections from the IP address of the computer where the gadget is running: check the VVEngine Settings section in the VVEngine help file.
- VVEngine is password protected.
Solution: If a VVEngine password is set, use the option "Allow Access to VVEngine Read-Only Pages without Password". This option grants read-only access to the gadget. For more info, refer to the VVEngine Main Settings section in the VVEngine help file.
| VVEngine Gadget Options |
To change gadget options, right click on the VVEngine Gadget and select Options.
The following options are available:
VVEngine address: This is the VVEngine address where the gadget gets the profile information from. The default address is http://127.0.0.1:8001: this is the standard address when VVEngine is running on the local machine.
Profiles per page: Number of profiles per page to be displayed in the VVEngine gadget.
Auto-scroll: Sets the gadget to automatically scroll through pages if necessary.
Refresh rate: How often the gadget refreshes and gets updated profile information from VVEngine.
More Options
Size: Sets the gadget width / size on your desktop.
Always on top: Keeps the gadget always on top of all other open windows so it's always visible.
Opacity: Sets to what degree the gadget is visible. 100% opacity sets the gadget to completely visible. 20% opacity sets the gadget to almost completely transparent.